HDR (High Dynamic Range) Notes
|
|
| Excerpts from emails to friends, plus a few additional comments. This isn't a tutorial, just the partial record of a few weeks' worth of exploration, discoveries and mistakes. And a few images. |
|
| |
High Dynamic Range photography began as a way of circumventing the limited dynamic range of the traditional photograph (film or digital) as compared to the human eye. Briefly, it involves three steps: First, taking several images of differing exposures, from light to dark (preferably on a tripod, and using aperture-priority mode so that the depth of field remains constant). Then a software program is used to merge the properly-exposed portions of each image into a composite file that contains a wider than normal range of luminance values. Finally, this wide-range image is recompressed (or tone-mapped) into the narrower range that can be displayed on a monitor or printed on paper.
These photos often have a unique "painterly" look, with an absence of dense shadows or blown-out highlights. Other characteristics of some (but certainly not all) HDR images is an increase in noise, as well as halos around high-contrast edges (as we occasionally see in images that have been over-sharpened). Some consider these qualities objectionable and try to minimize them (while retaining some of the expanded luminance range), others consider all of it (even the noise and halos) part of the process. Regardless of the approach, HDR photography is making new types of images possible and many photographers are intrigued by this. |
|
June 1, 2010:
Our recent discussions about HDR got me itching to try it again. The experiments I did a few years ago were interesting, but for some reason I just didn't stick with it... at the time I was more involved with wildlife, and HDR does not lend itself to moving targets. I do know I wasn't wild about carrying a tripod everywhere, but I'm over that... these days my tripod goes where my camera goes. Also, there seem to be better software tools available now. So perhaps it's time to revisit this interesting process.
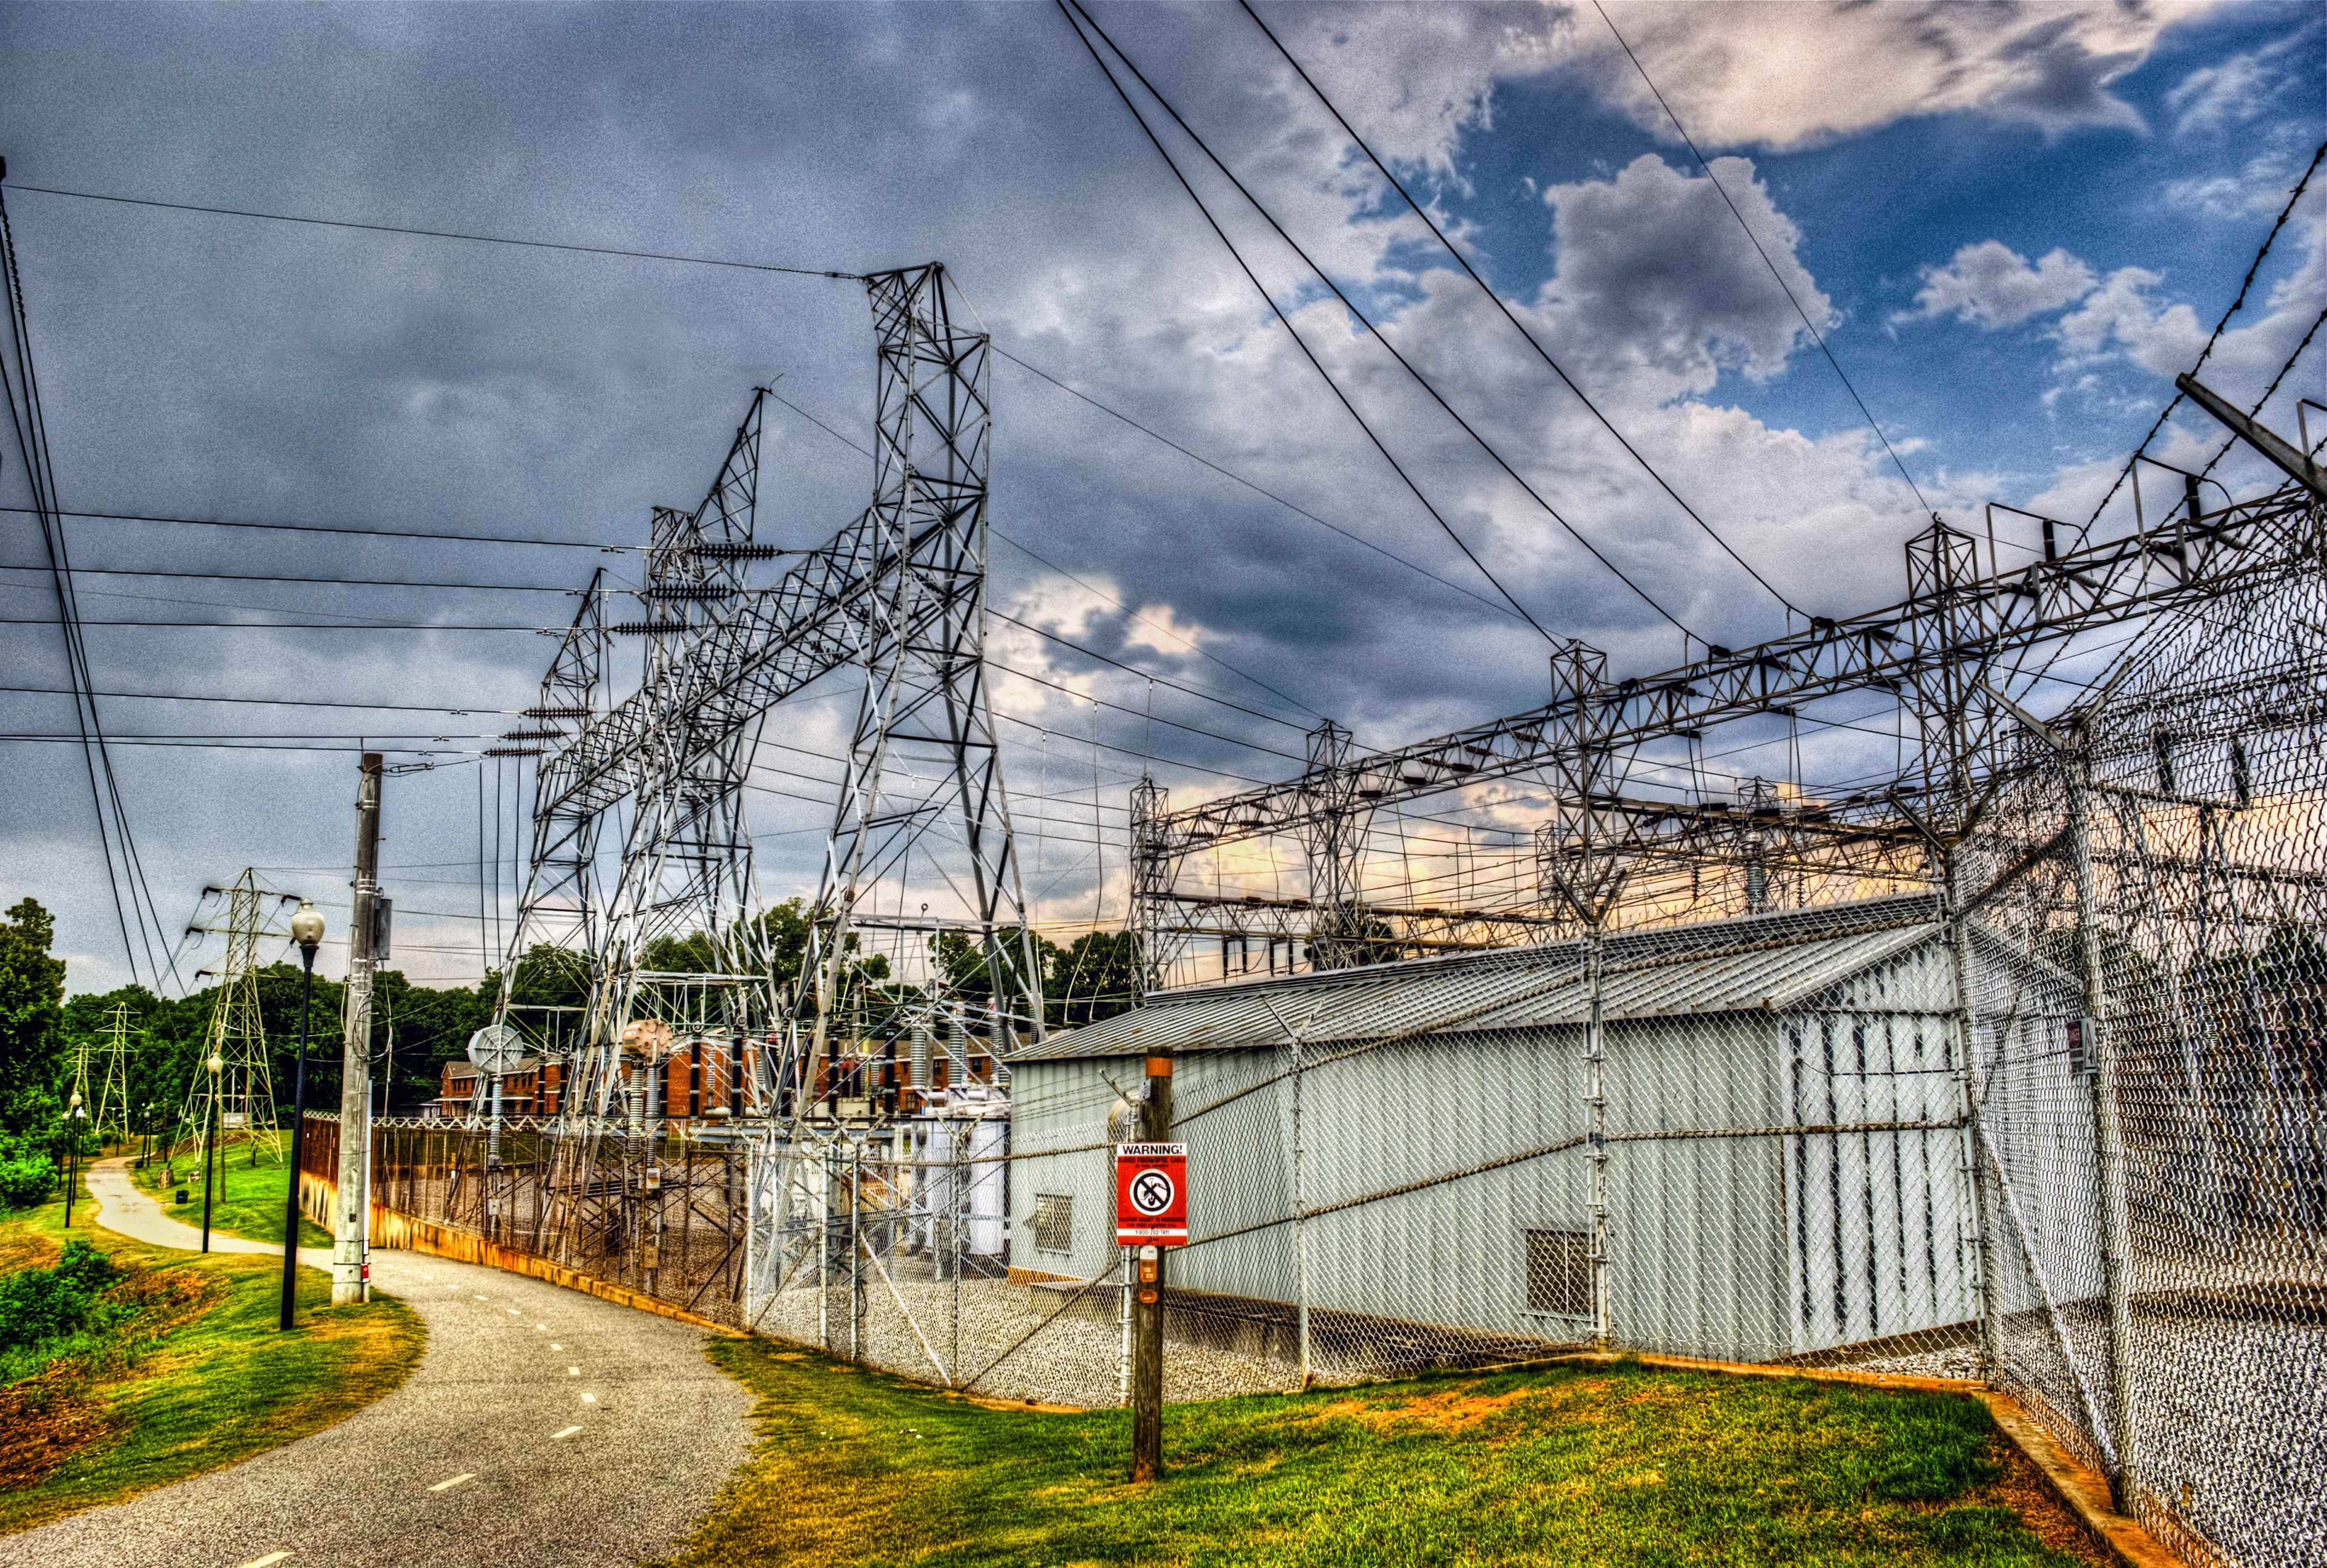
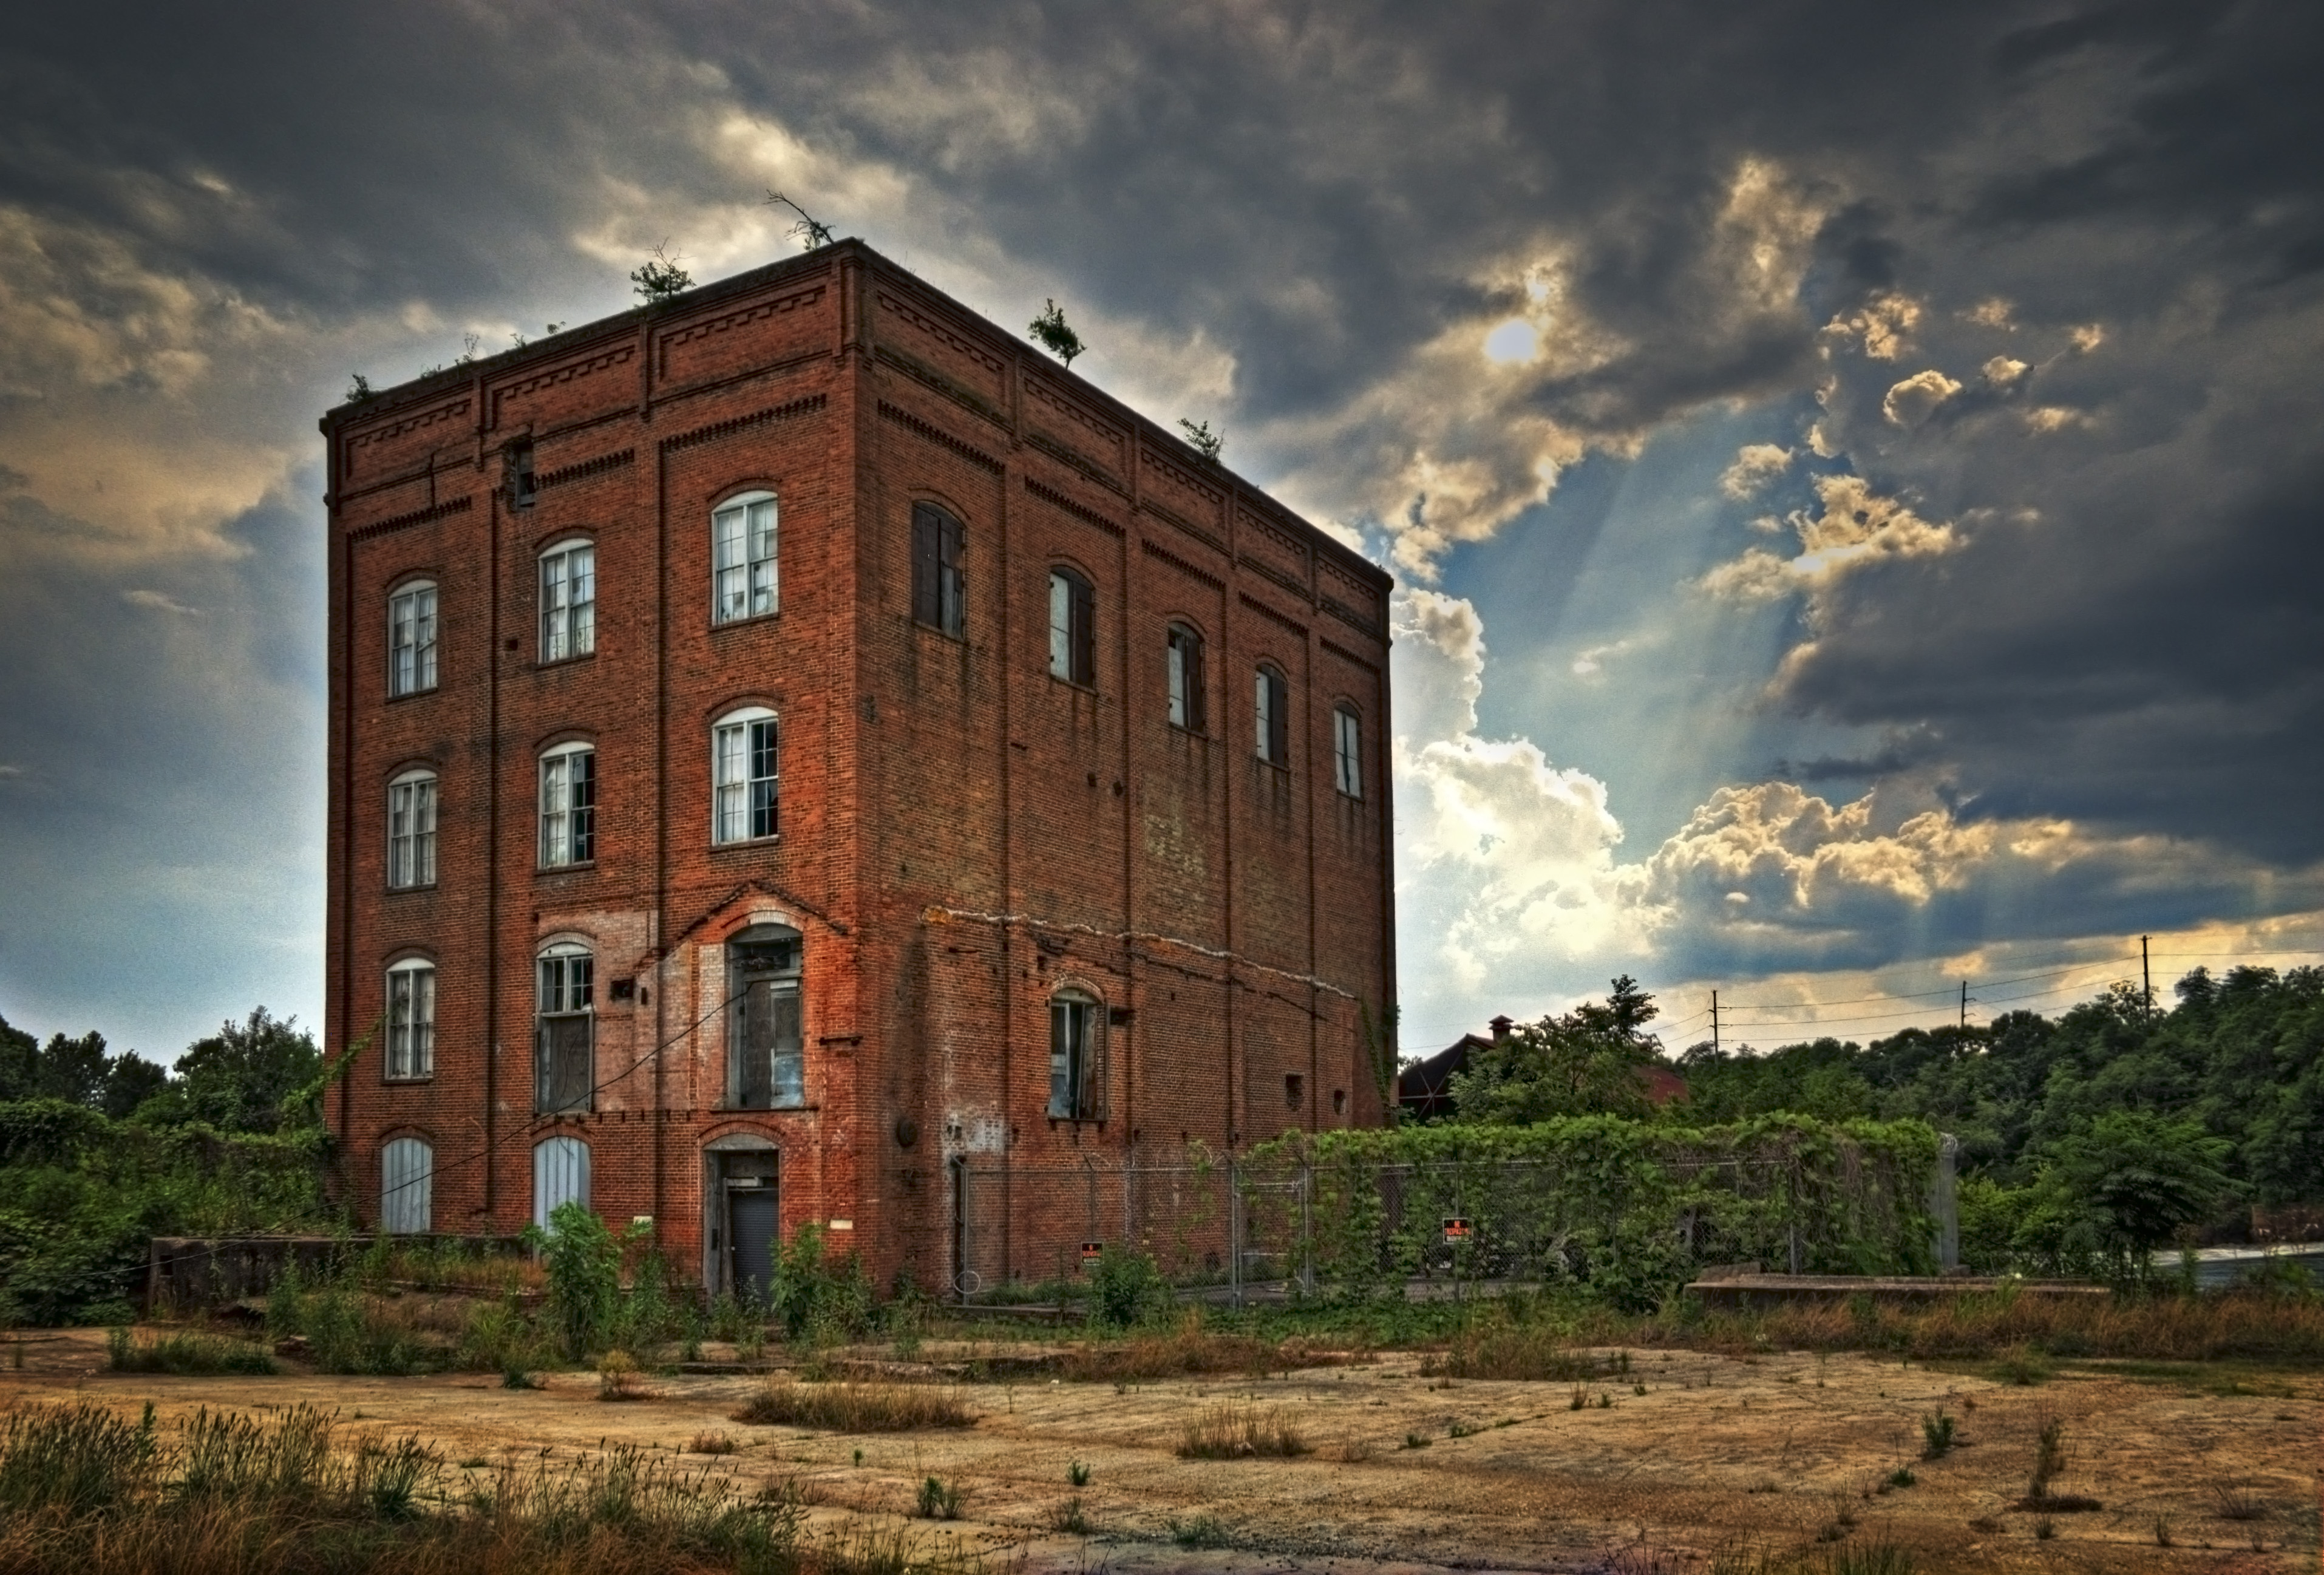
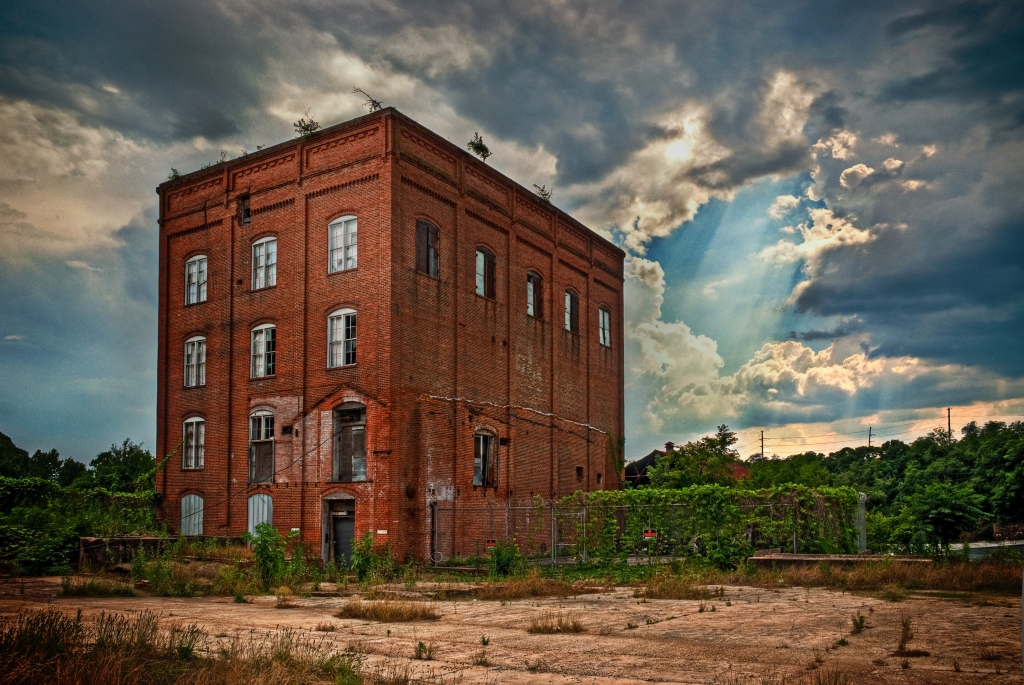
On Friday I went down to the river to shoot a few images after work. Some storm clouds were rolling by so the lighting was kind of moody... interesting but not much contrast. After a few abortive attempts to get some lightning shots I got down to business and shot the old mill and also a power station that was a short distance away. I'm still playing with them but here are a couple of samples... |
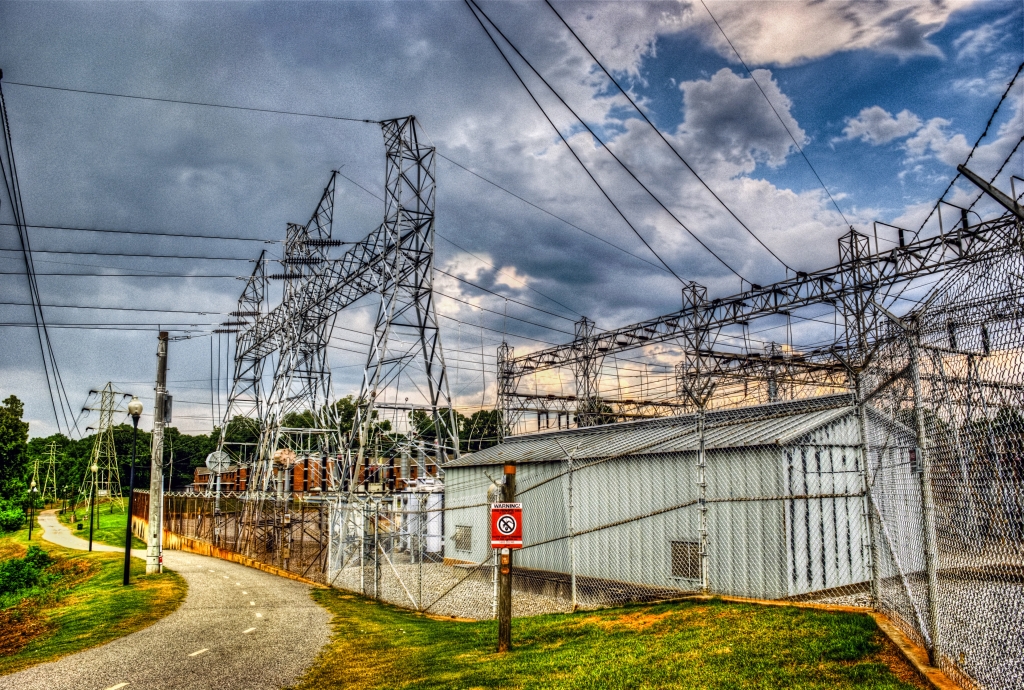

Each one is a composite of five images over an 8 stop range (-4, -2, 0, +2, +4) which were processed strictly for the HDR (in other words I went for the luminance range and didn't try very hard to suppress halos or noise). In addition, I ran a high-pass filter afterwards to boost contrast and exaggerate detail. Once all that was done I played with them a bit more (took out two wires that were not compositionally-friendly in the power station shot, and corrected the converging verticals in the old mill shot).
If you want to get an idea of how the details show up in this process, the images above are linked to the full-size versions... As you can see, with an 8-stop spread the shadows have to get pretty darned dark before you can't see anything (though I could have fixed that by taking more images), and the only blown highlight is one intense spot of sun in the mill shot. Though there is noise (mostly from the high-pass filter) it seems to add an interesting effect in places. However, the chroma noise in the sky is objectionable... I'm still working on that, I have a few ideas for getting rid of it. |
|
June 6, 2010
Well, it's dark and gloomy outside so I figured I'd spend some time on the computer working on those HDR images I took last week. There are so many sliders and options in the Photomatix software, I need to spend some time learning what each one does so that I can use them effectively.
Randall mentioned last week that the halo around the building bothered him a bit, and to tell the truth it bothered me too. Not wanting to get into a lot of hand-retouching or masking, I started from scratch in Photomatrix to see if I could reduce the halo while keeping the tonal range that I was shooting for in the rest of the image. Man, it is going to take a while to get the hang of this program... there are a LOT of adjustments you can play with, some of which have a huge affect on the image, others of which are rather subtle. Fortunately, there are several presets that you can try so if you find one that is going in a positive direction, you can start with that and alter it from there.
After some playing around, I was partially successful... when I imported the image into Photoshop Bridge and looked at it side by side with the original one, I could see there was less of a halo, but it was still noticeable. The important thing is that most of the tones in my original image were still there in the new version. So I brought it into Photoshop, did the perspective correction and other tweaks, then started masking the building so that I could softly burn in the remaining halo (I didn't burn the original image, instead I created a burn/dodge layer. This is a 50% gray layer set to Overlay mode that stays clear until you paint on it with darker and lighter grays... that'll burn or dodge whatever's underneath, but without messing up the original image). While I was at it, I burned the corners a bit and I also dodged the building a little (after reversing the building mask, which I'd had the foresight to save as a channel)... see how in the original image the building gets darker from bottom to top? Making it lighter at the top pulls it forward a bit, out of the picture plane, which I think is a nice improvement for such a subtle change. I also dodged a soft area over the hole in the clouds to bring out the sun's rays a little. |

All in all, I think it's an improvement... it still has a bit of the old postcard look I was going for and most of that annoying halo is gone.
Oh, by the way... here's a comparison of the final image with the one of the originals straight out of the camera (it's the center image of the group of five bracketed images I took... this is the one that the camera would have shot if it had been set on program mode). What amazes me is how much range is in the HDR composite. In fact, the software was able to pull out some cloud detail that was not even visible in the darkest of the five images (which may be one of the advantages of using RAW images to do these composites... even though the HDR software can combine a lot of info from jpgs, the more data you have to start with, the better). |
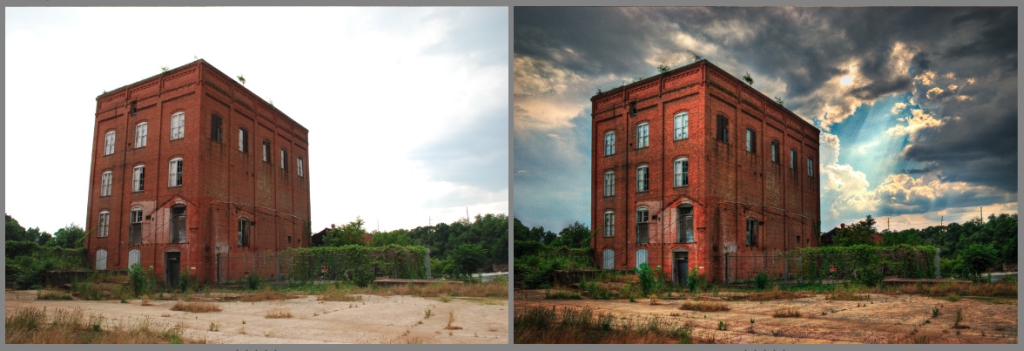
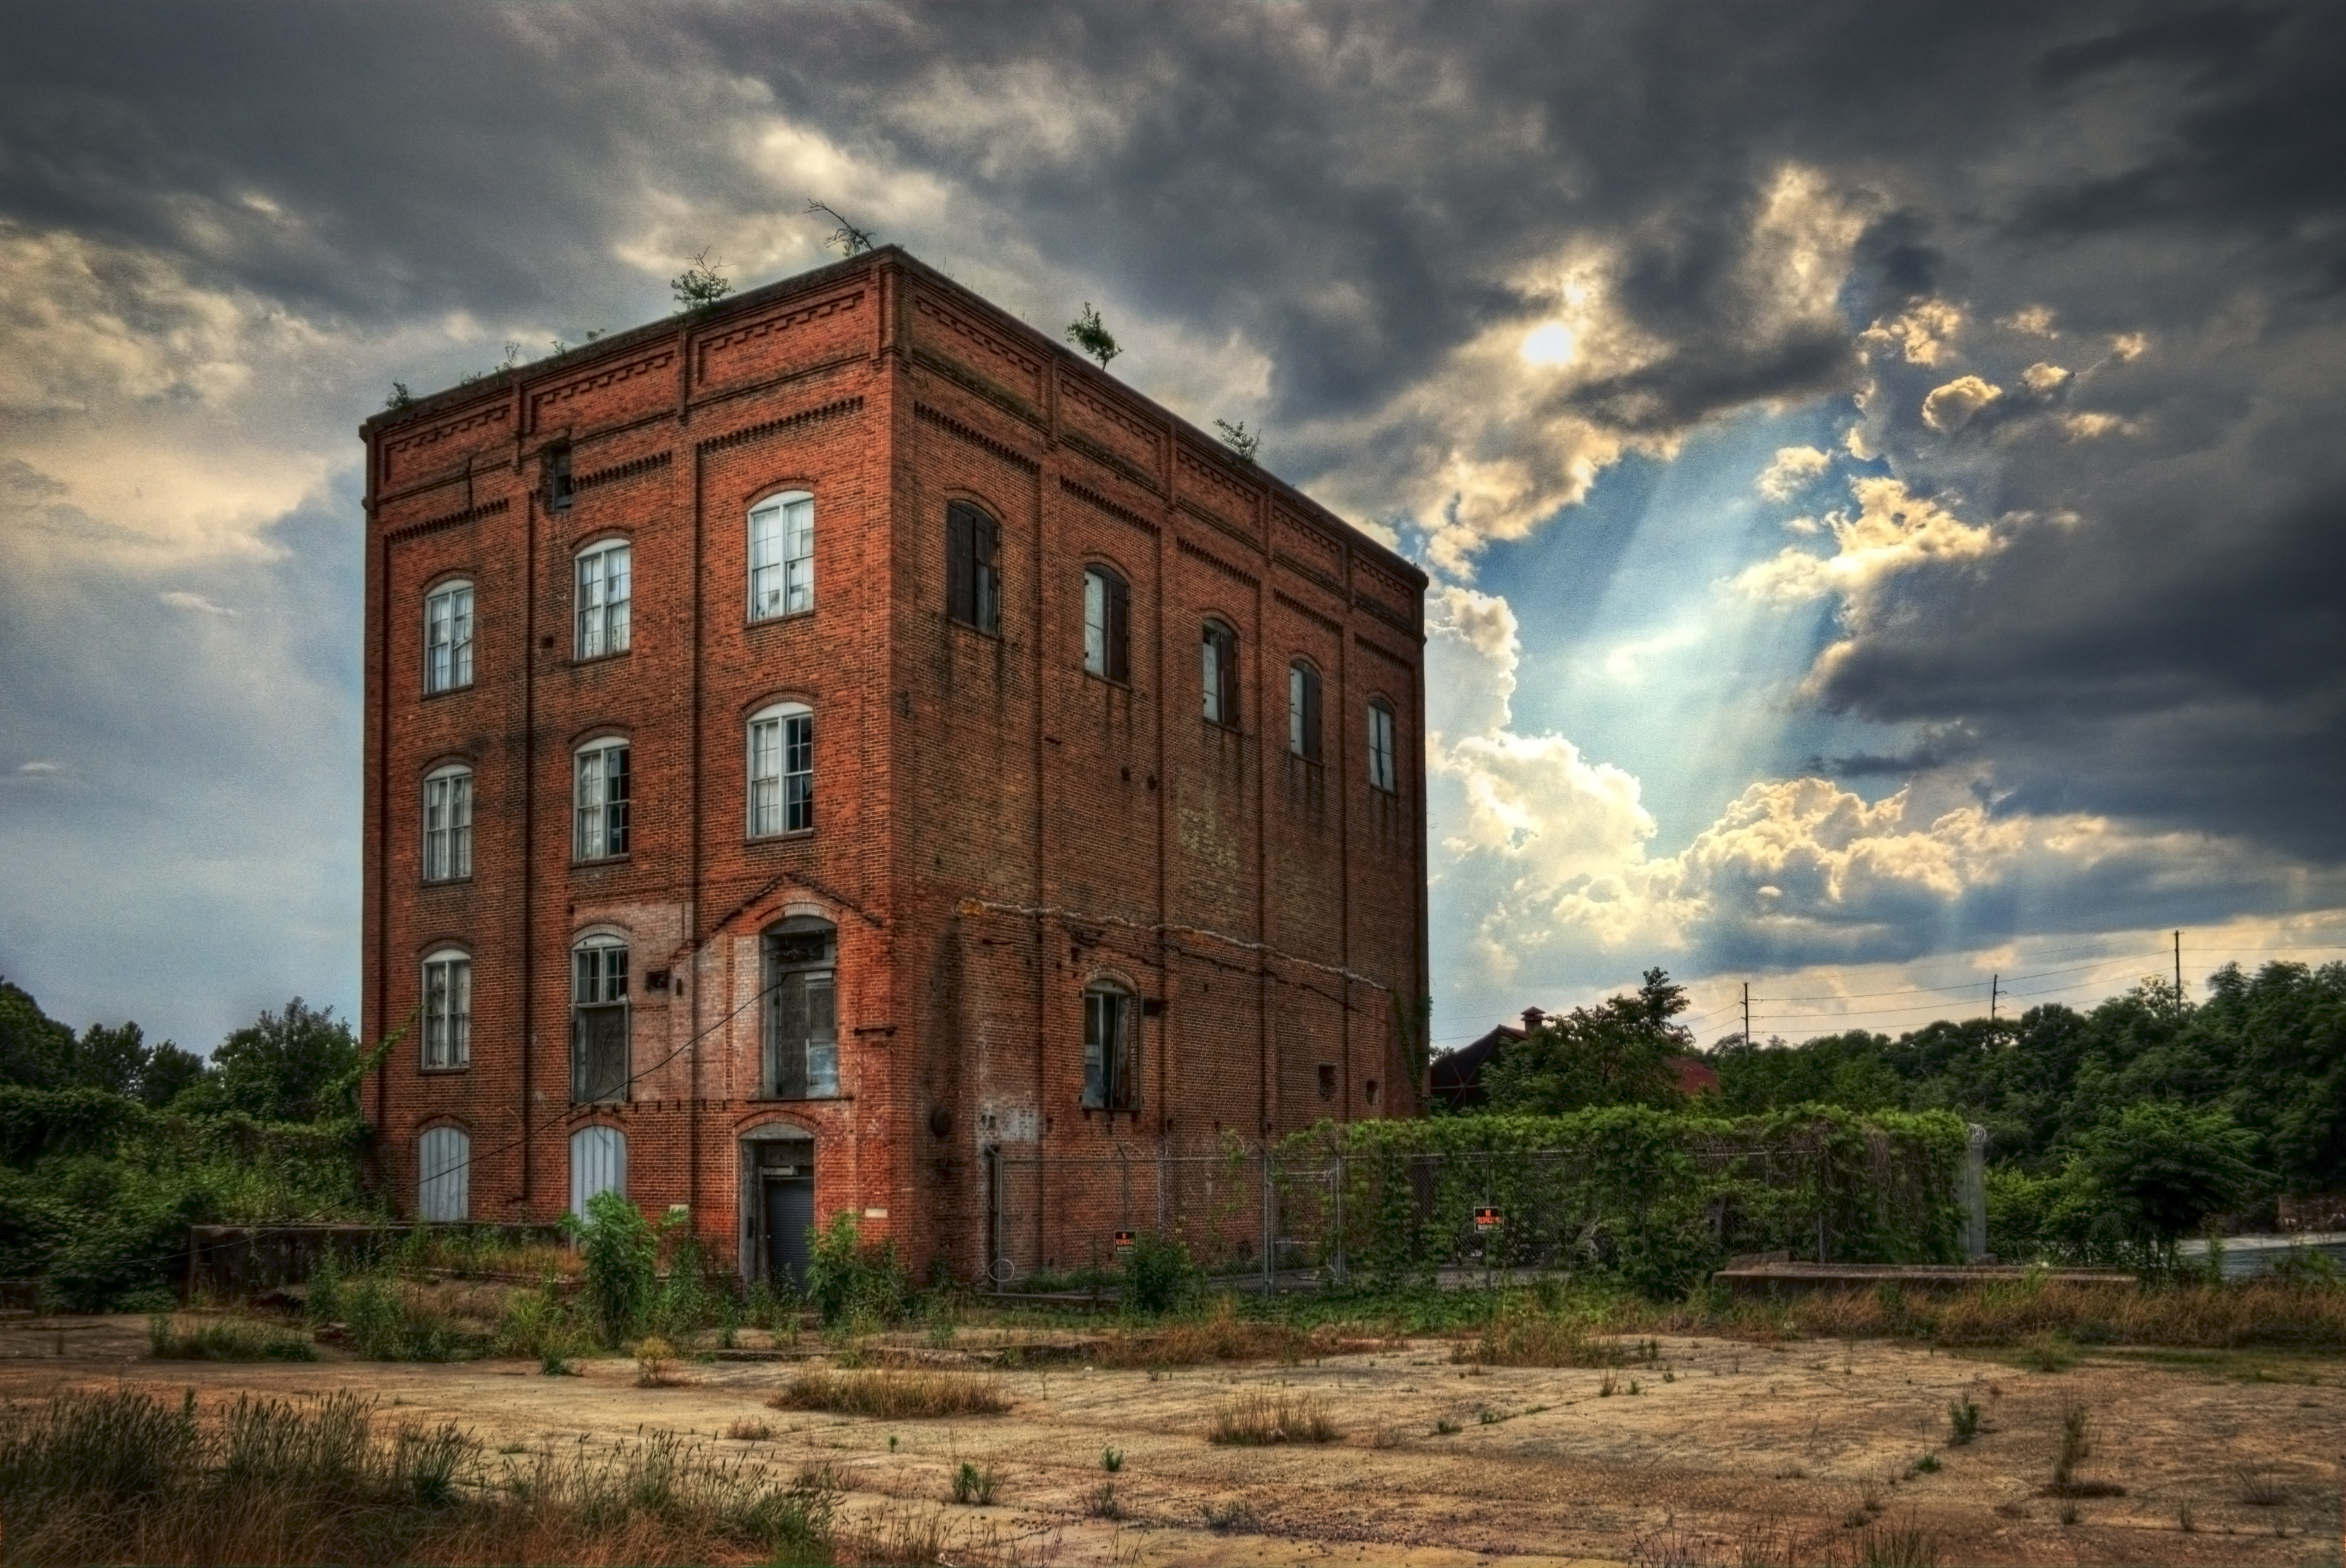
| And here's a larger view of the final image (click to see it full-size): |

| The cool thing about HDR is that it seems there is detail nearly everywhere, which makes it fun exploring large images for tiny hidden things that would usually be buried in shadow or glare. Hmmm... I wonder how long it would take to put together an HDR panorama? |
|
June 6, 2010:
In
the interest of full disclosure, I have to admit that most of the
credit for these images has to go to Photomatrix, and the HDR process
itself... the only things I did that might present any sort of problem
for the uninitiated would be that bit of burning-in using a mask, and
correcting the converging verticals of the building (which, as you
know, was an easy fix in the darkroom back in the old days, by just
tilting the easel... it's just about that easy in Photoshop, once you
know where to go to find the warp tool).
I have to
say this... just like seeing a print come up in the developer never
gets old, there is something about the tremendous range of
possibilities inherent in the whole digital process that just takes my
breath away. Consider this HDR technique, for
example... isn't it amazing that somewhere along the line some guy got
the idea that you could take a series of images (each of which
individually had a far smaller dynamic range than the human eye is
capable of seeing) and then use a simple software program to combine only
the well-exposed parts of each one into a huge file with a humongous
amount of dynamic range? So what if no computer monitor or
printer is capable of actually displaying that kind of range, at least
you've got all the info in ONE FILE... once you've got that, you can
just use another software routine to compress and remap those values to
a range that the computer monitor CAN display... and now all of a
sudden you've got an new kind of image... one that may not look like a
traditional photo, but it reveals the kind of range and detail that we
might see if we were at the scene (where our corneas, with their
greater dynamic range, and irises that can almost instantly adapt to
the brightest highlights or deepest shadows, can take everything in
with more ease than a camera). To me, this just seems like some sort
of like magic... and, just like a print in the developer, I kinda
hope it will always retain a degree of awe and wonder even
after I become more familiar with the process and maybe start to take
it for granted a bit.
Funny thing too, playing with HDR has made me curious about all the
info that might be hidden in just ONE image. As you know, for a
while now I have been routinely shooting RAW. Mostly it is just
to get me out of trouble. For example, when I get stuck in the
woods at twilight with my slow telephoto, I can usually underexpose a
RAW file by several stops with the assurance that there will be enough
data there to rescue in Photoshop when I get home... it may be noisier
than a properly exposed photo, but given the choice between a noisy
photo and no photo at all, sometimes you just gotta go that way.
But I digress. When I went down to the river to shoot those HDR
images, I knew that the HDR process would probably be able to make do
just fine with jpgs (after all, it is just taking the well-exposed
parts from each image, right?). But I shot RAW anyway, out of
habit. When I got home, here's the series of images I ended up
with: |

The
middle one is the one my meter said was "perfectly exposed," while the
other four were over and under exposed by two and four stops.
Yesterday after I emailed you, I started looking more closely at that
darkest image (which is the only one with an acceptable sky) and I
wondered how much detail I could dig out of the dark areas. In
other words, could I use a twelve bit RAW image to create an ersatz
eight-bit HDR image?
So I took it into Photoshop
and began playing with the shadow/highlight recovery tool.
Instead of using it in a subtle way to create a natural-looking image (as I usually
try to do), I just dragged the shadow and highlight sliders to maximum,
then raised the radius sliders too (to eliminate halos). Guess
what? The damned thing looked a LOT like an HDR photo.
There were some pretty ugly artifacts at high-contrast edges... (where
very light and very dark tones meet), but I guess you gotta give up
something when you only have one image. I went ahead and played
with the curves a bit, and boosted the saturation a little, and here's
what I ended up with... the HDR image is on the left (this is the one
straight out of Photomatrix, before any of the Photoshop tweaks in the
version I sent you yesterday) and my "pseudo" HDR image is on the
right. The pseudo version is nowhere near as good... notice how
there are still blown highlights in the clouds, less textural detail in
the concrete foreground. less detail in the dark doors and
windows. And at full size, there's way less noise in the true HDR
image (in fact, it is the lack of noise that makes the HDR image look a
bit softer at this reduced size). But what really amazes me (when
you look at these two images in an overall way and at this small size),
is how startlingly alike they are! I'm not sure I could
ever refine the 'pseudo-HDR' image to the point that it would produce a
good quality large print, but maybe I did learn something from this
experiment... that there is much more data hiding in those RAW files
than I had been aware of. |

| Here's a noise and detail comparison, at around 300% magnification... HDR on the left, single-image conversion on the right: |
Some
interesting things show up here. Overall, the left image is far
better... less luma noise, better color, more detail. Only places
it falls short is the chroma noise in the sky, and the crispness of
some edges (like that roof line). The sky noise I can remove
pretty easily since it is chroma noise and Photoshop has a nice routine
for that (it's luma noise that is a devil to deal with... that
salt-and-pepper texture in the right-hand image will never go
away). The softness of the roof line may have something to do with
the fact that I'm combining five images. I was lazy this time and did
not use my wireless shutter release, so I'm betting that the softness
is from camera movement between images... I need to be more careful in
the future I guess.
Anyway, this was a fun experiment.
I'll have to file it away for future reference, in case I see a subject
that screams HDR but I don't have my tripod with me.
Also interesting are the single-image conversion processes that you will find described in several online tutorials, which I believe have the potential to produce better results than the above method.
One process involves adjusting a RAW file or a jpg (in Adobe Camera Raw and Photoshop respectively) to create a low-key image with recovered highlights and a high-key image with recovered shadows, then merging the two along with the original mid-tone image into a 32-bit HDR file and going from there.
The second method involves taking a RAW file and converting it to 32 bit in Photoshop, then processing that as an HDR file. |
|
June 7, 2010
I'm
still trying to figure out what constitutes a good HDR subject...
there are a few fuzzy borders here. On the one hand, you tend to
see
certain types of subjects favored in people's online portfolios...
these usually
seem to be wide-range scenes that are hard to photograph by
conventional means, like night scenes with lots of lights, contrasty
'high-noon' images, dark interiors with bright windows, etc.
Also, I notice that most scenes tend to present a lot of detail...
fancy architecture, decaying buildings and rusting cars, industrial
machinery, that sort of
thing. In that respect, I think the idea you mentioned about
tackling the old buildings in the Historic District is a good
one. There are a few places around here that I have in the back
of my mind as well... a few deserted buildings and perhaps the railroad
yard.
On the other hand, most art (and by extension, photography) is about
things like personal vision, disobeying rules, and finding new ways of
communicating. In that sense, it becomes more difficult to define
what might make a good HDR subject. Things that one might already
have an affinity for, like macro subjects, horticulture, or whatever...
these might be interesting things to explore. I don't know if I can
recall seeing an HDR photo of an insect or dandelion, I'm sure they are
out there somewhere but if they are I am also sure that each
photographer's take on them would probably be different and personal.
Yeah, multi-image HDR would be tough with a roving beetle or a swaying
blossom, but with the right subject or proper preparations it could be
possible.
I guess what I'm getting at is that we need
to take a fresh look around, keeping in mind the qualities of HDR but not being bound by them, just try to
see if those qualities might be flattering to things that we already have an affinity for, or things we see
everyday and take for granted but that others might find unique and
interesting as photographs.
We
also need to get over our 'viewfinder vision,' that tendency to see
what we are looking at in terms of conventional photography. I know
that's not easy when we've been shooting photos for several decades.. I
remember when all I shot was black and white, I'd sometimes mentally
translate my surroundings to black and white terms even if I didn't
have my camera with me. HDR is a new way of making images... so we
probably need to develop a new way of seeing before we can make the
best of this process. |
|
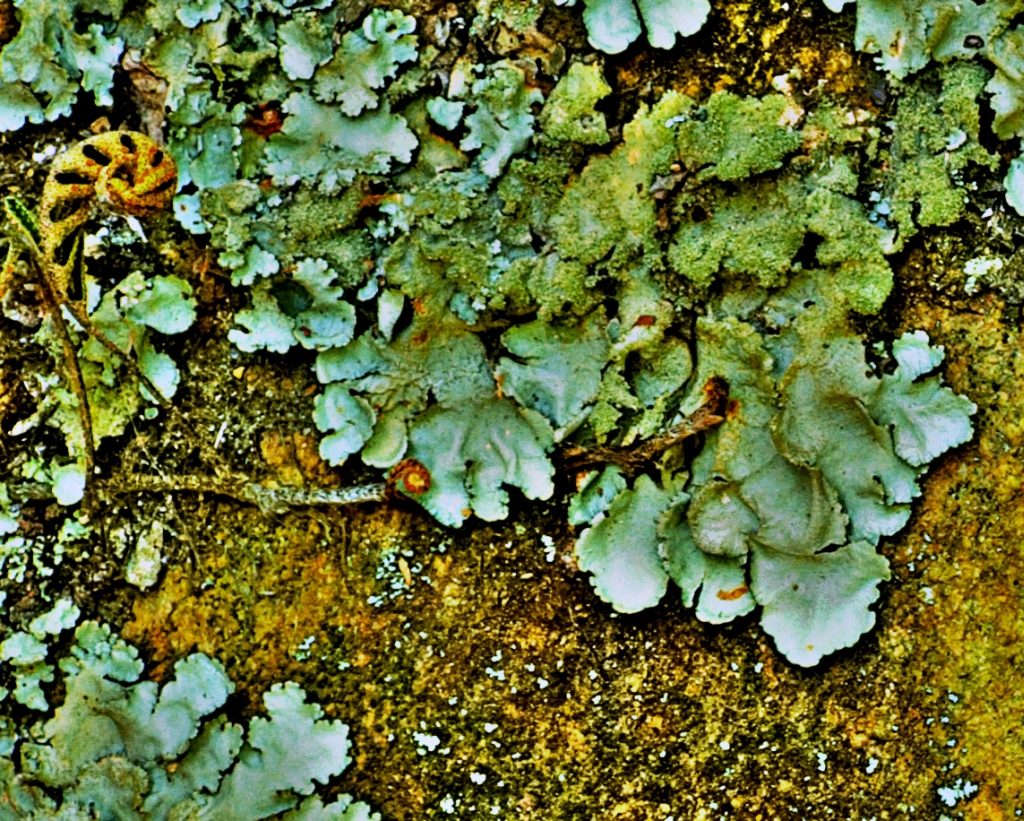
June 9, 2010:
Well, I stopped by Flat Rock Park yesterday and took a few HDR images, one of which was not your typical HDR subject but I wanted to see how it would come out anyway. It was a lichen-covered boulder under some trees... the lighting was dark and low-contrast so it was one of those situations where I could have gotten a fairly good image with just one shot and then some Photoshop work to punch it up. But I took five images over an 8-stop range with the idea that a 30 bit HDR file might not get that much more dynamic range in the luminance sense, but it would give me way more colors to work with ... so maybe I could do some interesting things to the image without getting the banding and blocking up that you get when you push a low-bit image too far.
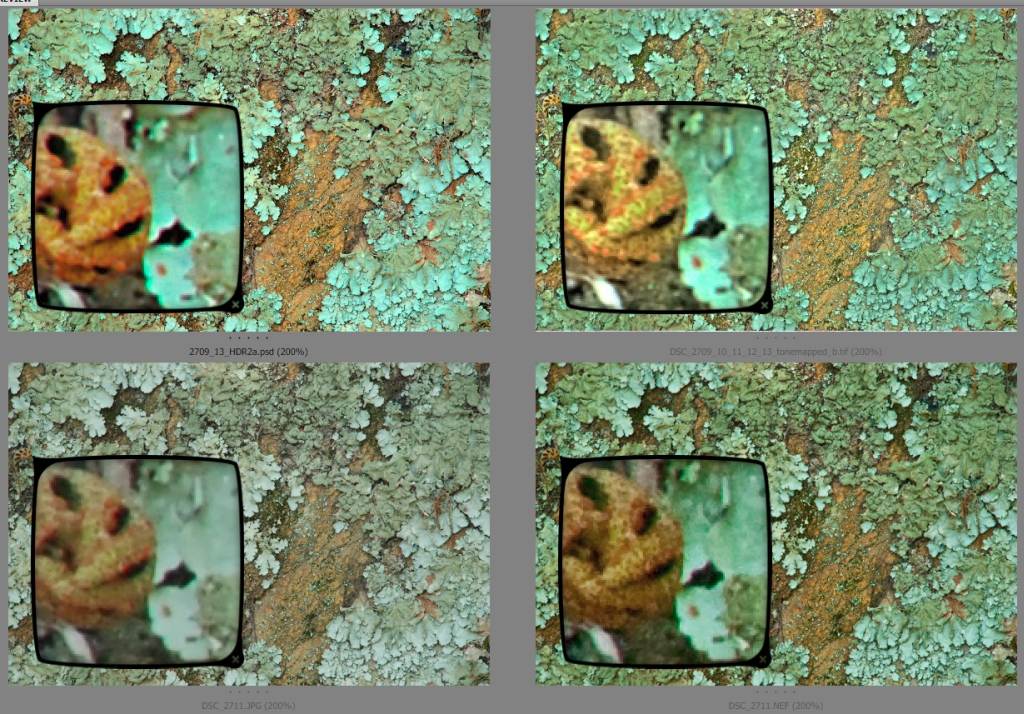
First I took the middle image of the five (the one that my camera's meter said was the correct exposure... lower left in the composite below) and worked on the RAW file until I got an image that was pleasing to my eye (lower right, below). It's probably more contrasty and saturated than what was really there that day, but I do think it is probably closer to "human eyeball" reality than the somewhat dull image that came out of the camera.
Then I took all five RAW images and combined them in Photoshop's HDR, which does not have as many tools as Photomatix but will produce a good image if you are not looking to do a lot of tweaks. In this one, I went for an even richer look than in the single image but still tried to keep it looking more like a straight photo than an obvious HDR image (upper left).
Then I did another HDR, this time in Photomatix, first trying to produce a similar result to what I had in Photoshop's HDR tool, then a second version (upper right) where I went for a pronounced HDR look, more detailed and textural and flat. It is hard to see the "flat look" at this reduced size, it sorta just looks like a lower-contrast version of the other HDR image to the left of it, but if you look at the rolled-up fern in the magnified view you can see the interesting way that the different colors have spread out and the contrast and detail has changed. |
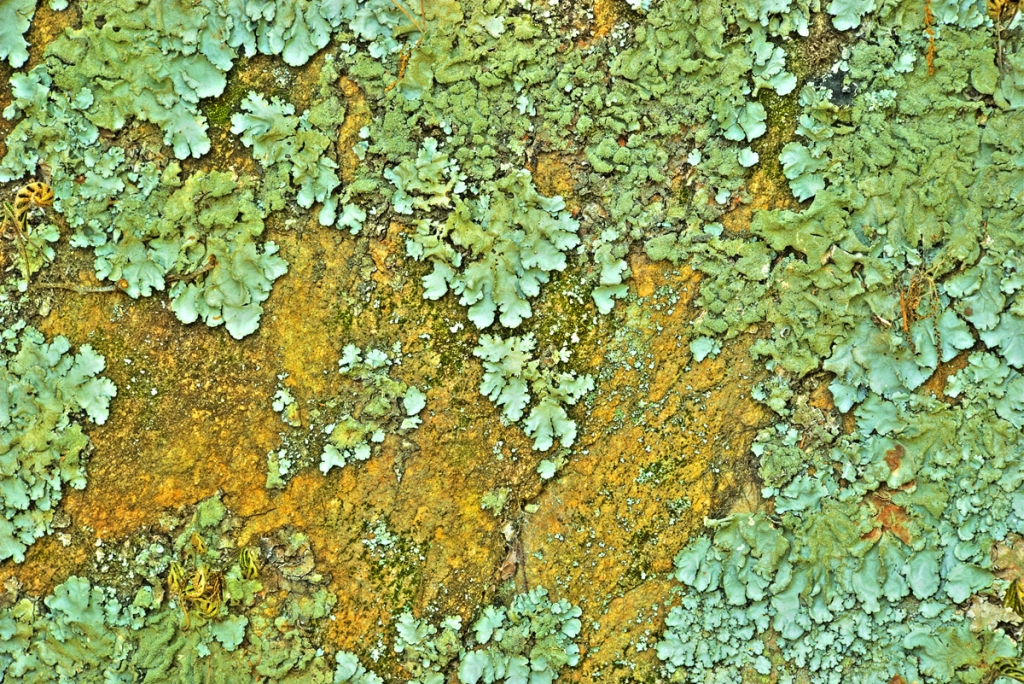
| I decided to take the last HDR image further in Photoshop while I still had a high-bit image to work with. Here are three versions, each of which gets increasingly wilder and more extreme. Though I think the character of the rock and lichen are not lost, they do take a less dominant role compared to color and texture. This first image is the one that came out of Photomatix (the upper right in the above comp), just at a larger size so you can see the details: |

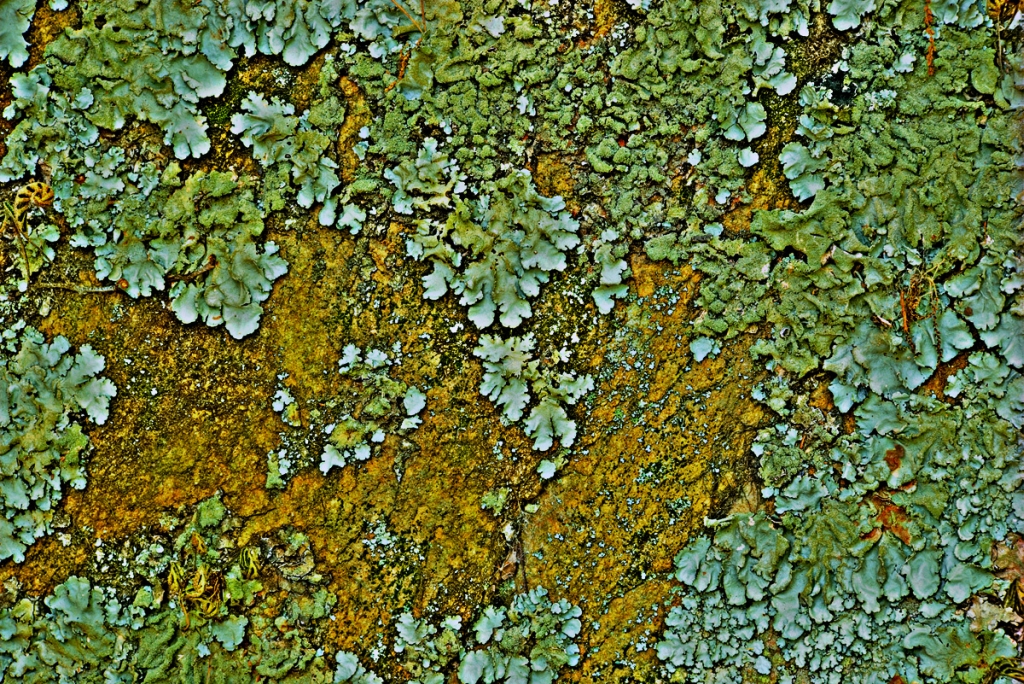
| This second image got some color enhancement with the Hue/Saturation tool in "local" mode (targeting specific colors), as well as a bit of a contrast boost in Curves: |
| This last image was 'hypersharpened' (with a high-pass filter on a duplicate layer, same trick I used on the old mill photo from a few days ago but more pronounced this time). This one is pretty interesting in the full size version, I might send this one off to see how it looks in a large print. The bottom image is a 100% crop that shows the detail a little better. |
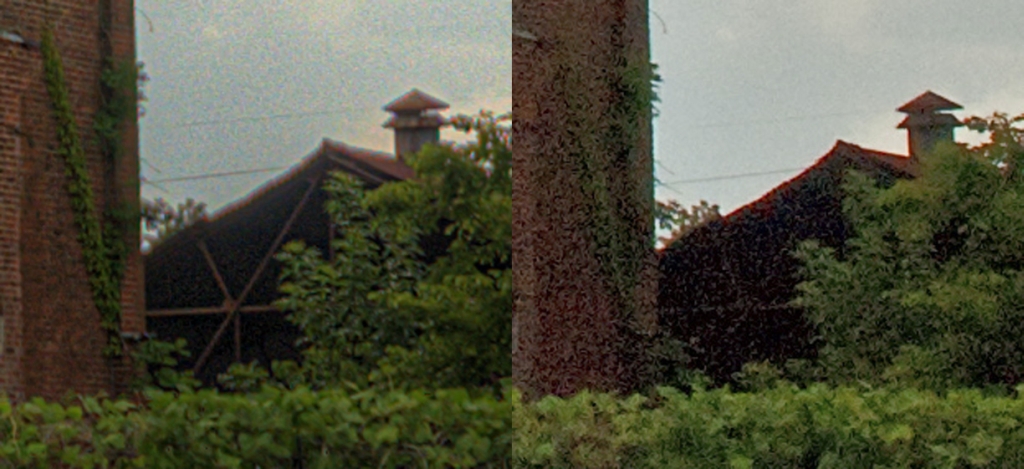
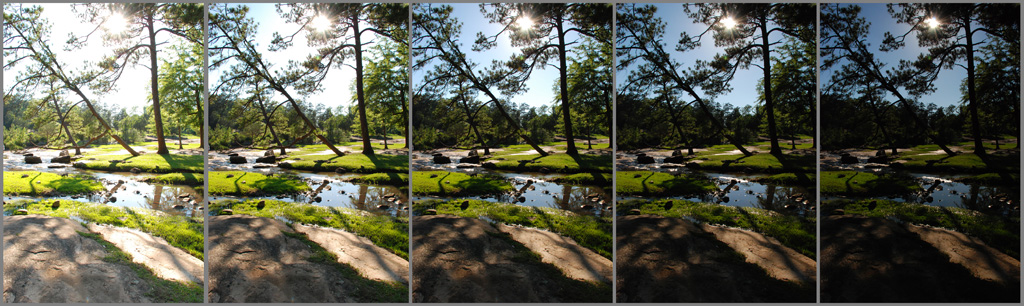
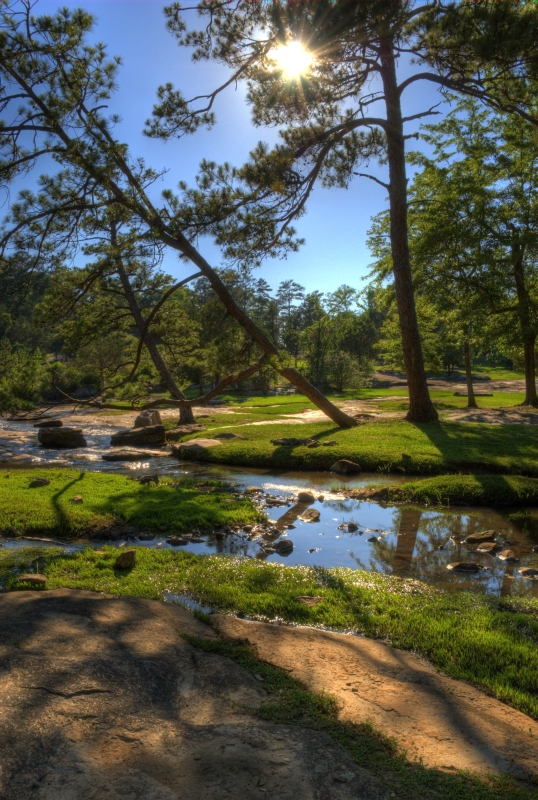
| The other HDR image I shot at Flat Rock Park was this one, a wide-angle view with the late afternoon sun peeking through the trees. I went for a more conventional approach, using HDR to dig some details out of the dark tree trunks and get a nice blue sky. Overall, I think it came out pretty well, aside from some artifacts in the water highlights. |
 |
June 10, 2010:
After looking at some portfolios of different photographer's HDR work, and looking at several more HDR tutorials on YouTube (some of which are
pretty good, and some of which seem to have been done by semi-literate
boobs who can't even pronounce the name of the software they're using), I
think it's pretty much a given that there are MANY ways to approach
this process. It's not just a quick single-click process like selecting
"Auto Color" or "Desaturate" in Photoshop.
By the same token there are a few general qualities of HDR that help define it as a process and as a "look," something with a character all its own...
In
some respects it is really more like painting than photography, since
we are dealing with a very subjective process that throws some of the
traditional rules (and limitations) of photographic technique out the
window. In fact, I don't think it is an accident that many HDR images
do look more like paintings than photographs. Why? Because with enough
skill, the painter can put everything he sees on the canvas, while the
photographer is not quite as free to do this ... with the state of
current technology, the photographer is not yet able to control film
stock and developer the way a painter can control brushes and paint,
there just isn't enough latitude to accommodate what the human eye can see at the scene.
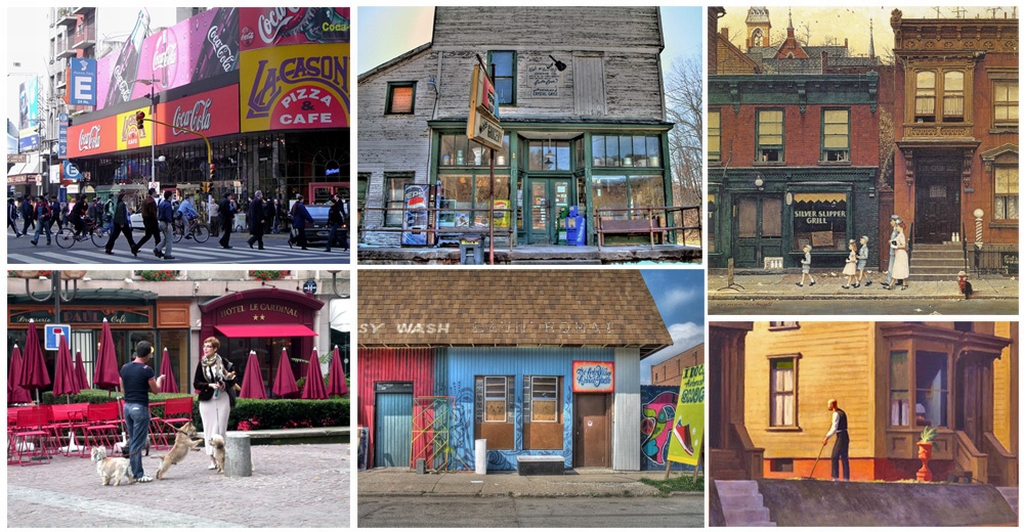
By
way of example, here are a few street scenes... two relatively
conventional photos on the left, a couple of HDR images in the middle
and two paintings (by Norman Rockwell and Edward Hopper) on the right.
Perhaps the most obvious difference, and the thing that ties the
straight photos and the paintings together, is the fact that the HDR
images don't have people in them (this is still a limitation of the
multi-image process that HDR practitioners still have to deal with).
But seen as a whole, I have to say that even though the HDR images are
similar to all four of the other images in some way, the general look
primarily seems to drift more toward the paintings than the
photographs. |
Regardless
of how the images look, or what we'd like to compare them to, one thing
becomes clear from watching the tutorials and examining the work of
different photographers... there is a tremendous amount of room for
experimentation, given the many adjustments that can be made in the
software. And perhaps also because the discipline is rather new,
which means that folks are still figuring it out. As with
computer graphics in the 1980's, or art photography in the 1920's, the
rules were undefined and people felt free to make things up as they
went along. This is liberating for the practitioner but has the
downside of resulting in a lot of really horrible work in proportion to
the number of successes.
Most of the tutorials currently available
seem to center around two programs... the HDR tool embedded in
Photoshop, and the standalone program Photomatix. I learned
something interesting... the Photomatix package seems to have more and
better tools for image manipulation, but Photoshop may do a
better job of actually merging the images.
So I did a little experiment with my images of the old mill... I
brought them into Photoshop and merged them, but instead of sending
the 32 bit file into Photoshop's tone-mapping software, I saved
the merged 32 bit file to the hard drive and then opened it in
Photomatix to do the tone-mapping. I tried to repeat the same
mapping steps I did with the first image from last week (which I did
entirely in Photomatix), then saved it. When I opened the first
image and the new image side by side, I could see a definite
difference... less noise and much crisper detail in the newer
version. So I guess there is a real advantage to doing
the merge in Photoshop. I still need to take this new 16-bit
image back into Photoshop to repeat the finishing tweaks... correcting
the perspective, masking out the halo around the building, and so
forth. Once I have a finished image, I'll send samples so you can
compare the two versions... it's a pretty amazing improvement really,
it's almost like comparing Panatomic-X and Tri-X. |
|
June 11, 2010
Here
are the results of the test I started last night, using Photoshop
instead of Photomatix to combine the RAW files, followed by roughly the
same finishing process to both from there on (tone mapping in
Photomatix, then tweaking the 16-bit result in Photoshop). A 200%
blowup of the new image is on the left side, compared to the one I did
a few days ago (using Photomatix to merge the images) on the
right. Quite a difference... less noise and a hell of a lot more
detail. I did this test because someone mentioned in one of
the online tutorials that Photomatrix converts its images to jpg before
merging, but merging in Photoshop does not. For those who
only merge jpgs, I guess this wouldn't be a big deal, but for those who
shoot RAW, it kind of negates the whole advantage.
The
thing is, RAW files do have more color information and dynamic range,
but there really should not be a significant difference in sharpness between RAW and jpg, at least not this much. So now I'm thinking there may be more
going on... perhaps Photoshop is also doing a better job than
Photomatix at aligning the images (even when shot on a tripod, it's
recommended that you let the software align the images). I dunno,
whatever it is, it sure looks a lot better. This two-step process
is a bit more of a pain but it looks like it's going to be worth
it. |
Still,
I hesitate to say that using Photoshop to merge images is absolutely
the best way to go, not on the basis of only one test. First off,
Photomatix offers several options before the merge so I guess it would
only be fair to try different combinations to see if results differ.
Also, it might be helpful to try the merge with jpgs in both
programs to see if there is something else besides the RAW conversion
that is causing the difference in sharpness. But for now, I think I'll
continue to merge in Photoshop, then proceed to Photomatix for the tone
mapping.
By the way, here's the finished photo with all the tweaks. Click for a full-size image. |
|
June 12, 2010
I got off work a little early Friday... not early enough to go anywhere because I had to go pick up my car at the shop, to the tune of six hundred bucks for brakes, axles and CV joints plus a few other odds and ends. Guess I should consider myself lucky, haven't had to do any major work on the old girl in a few years.
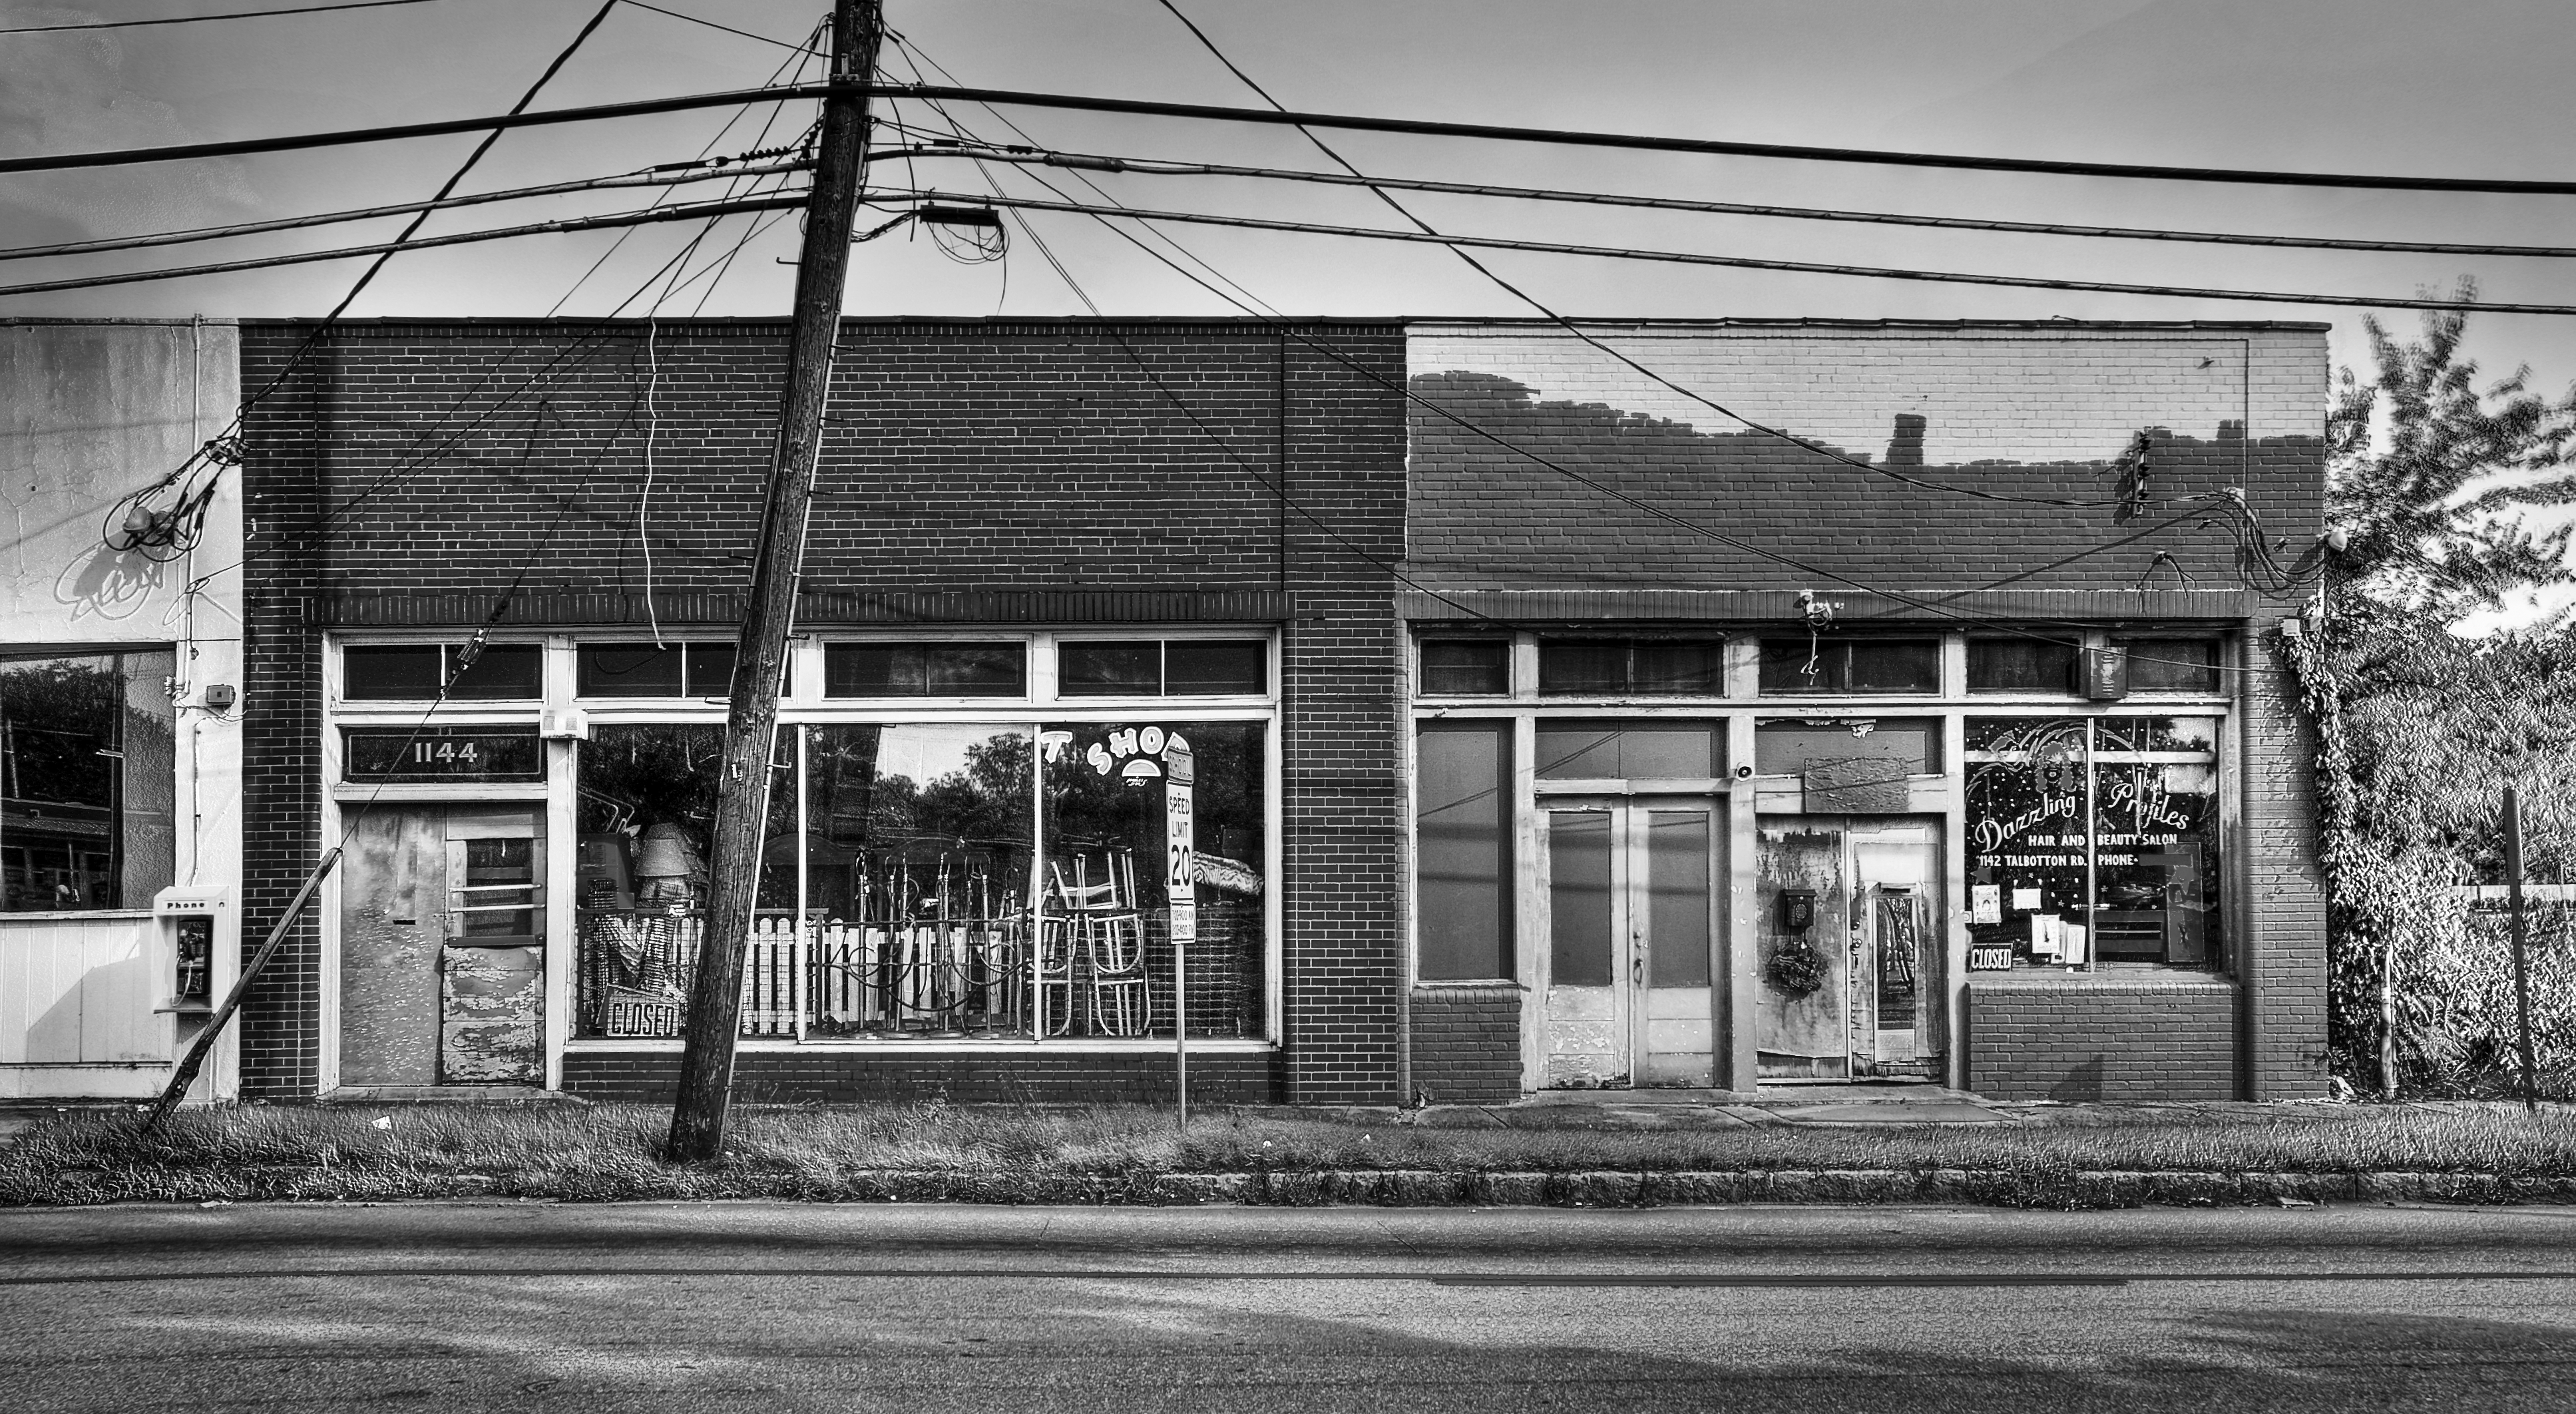
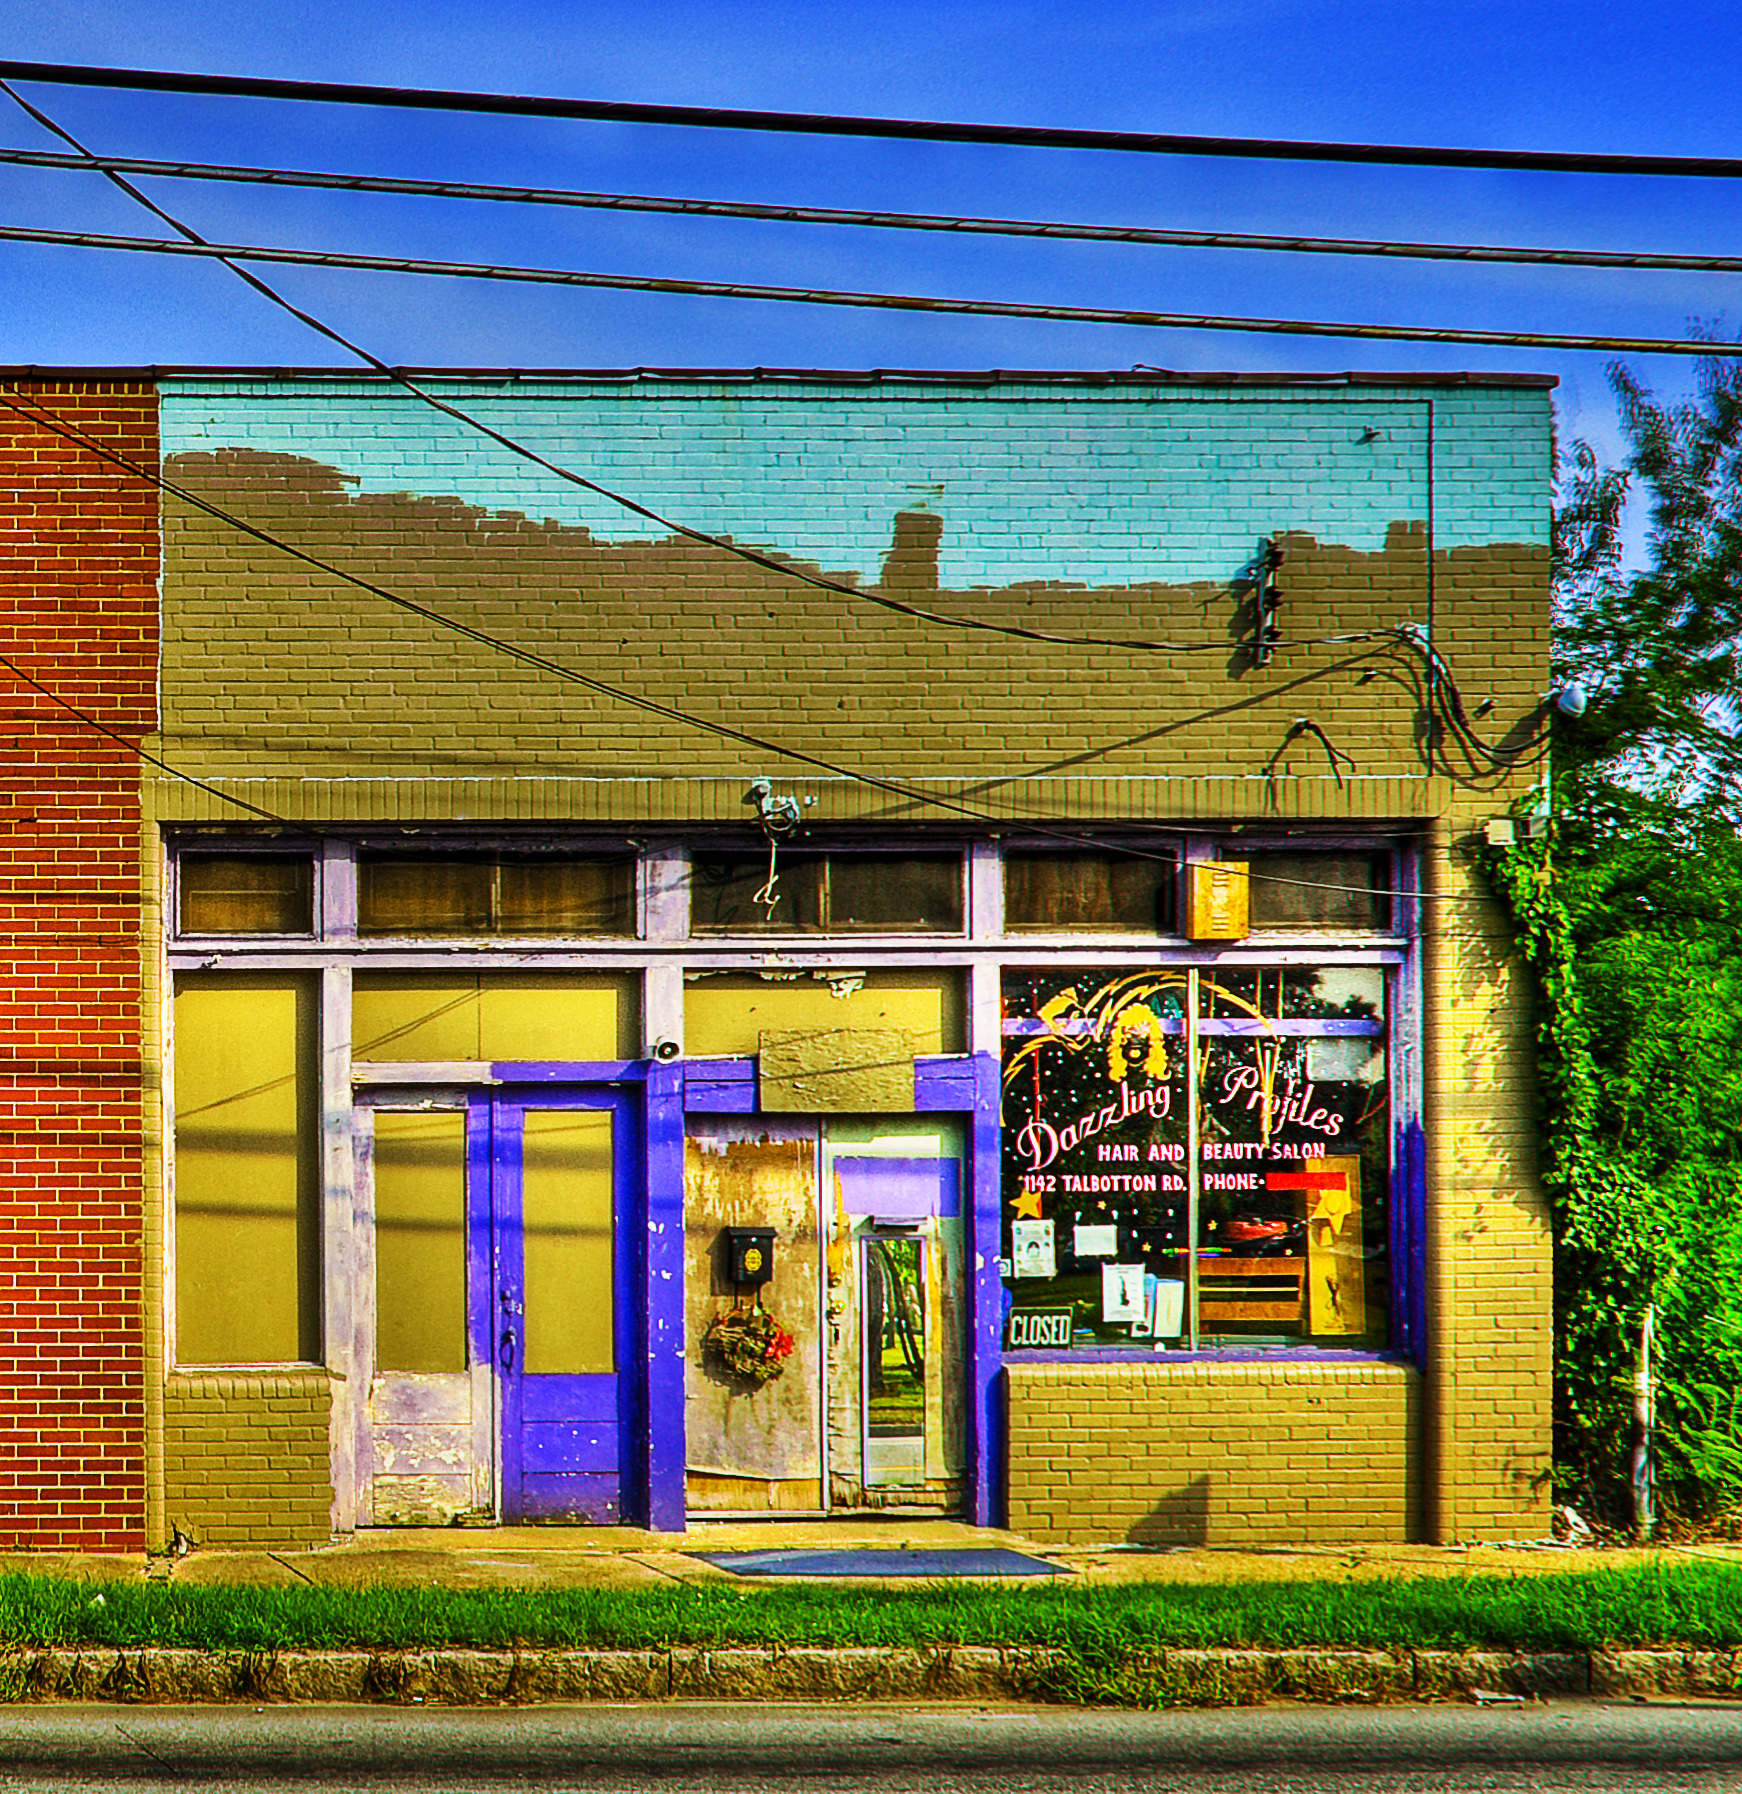
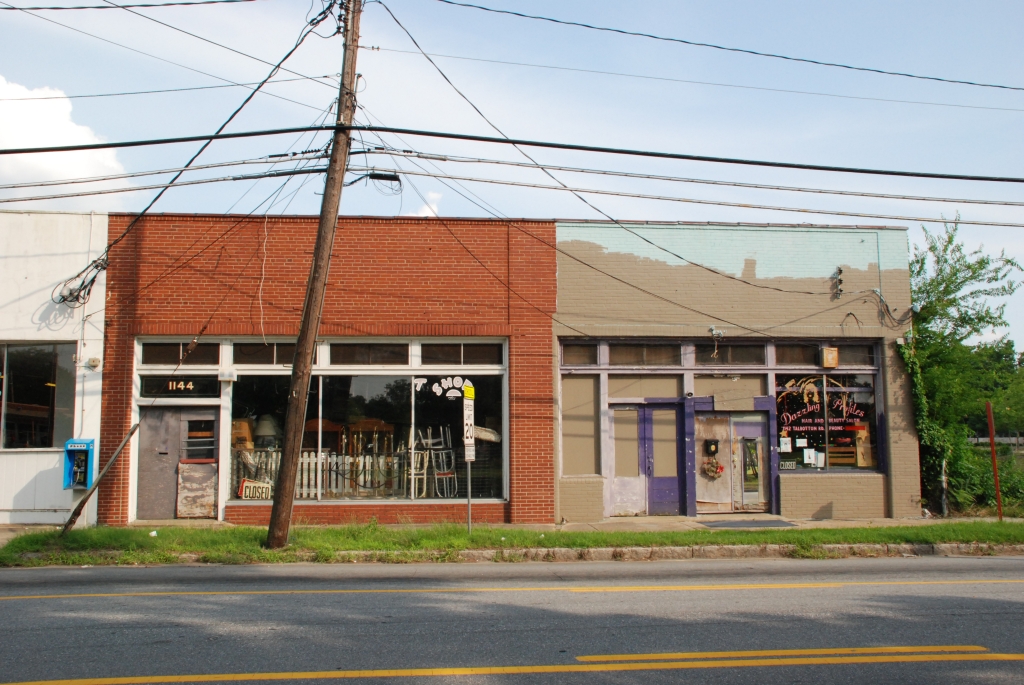
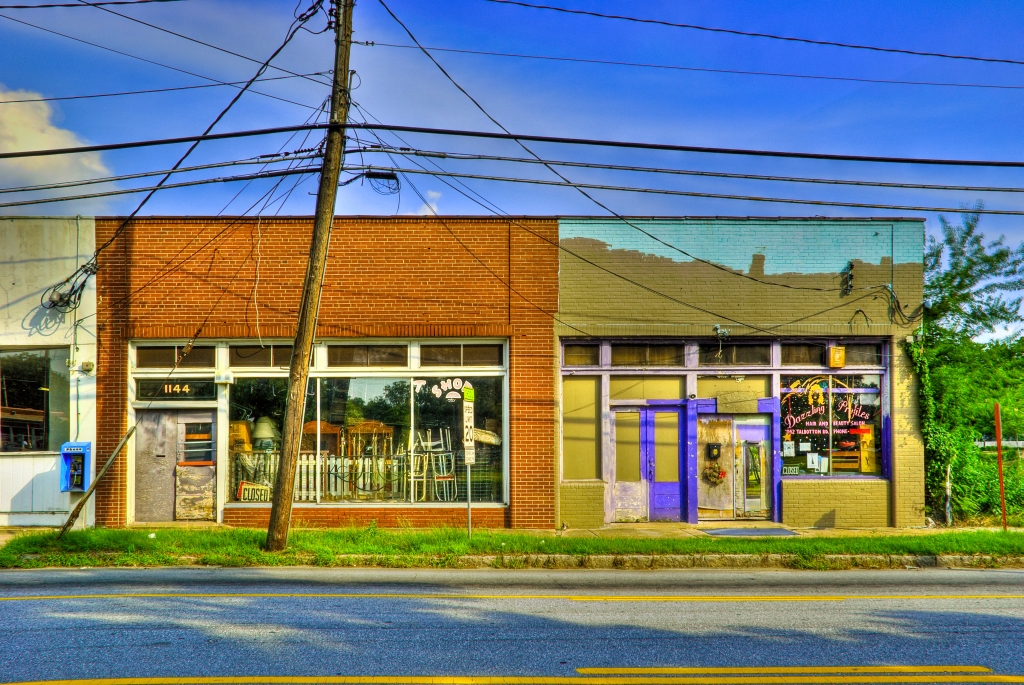
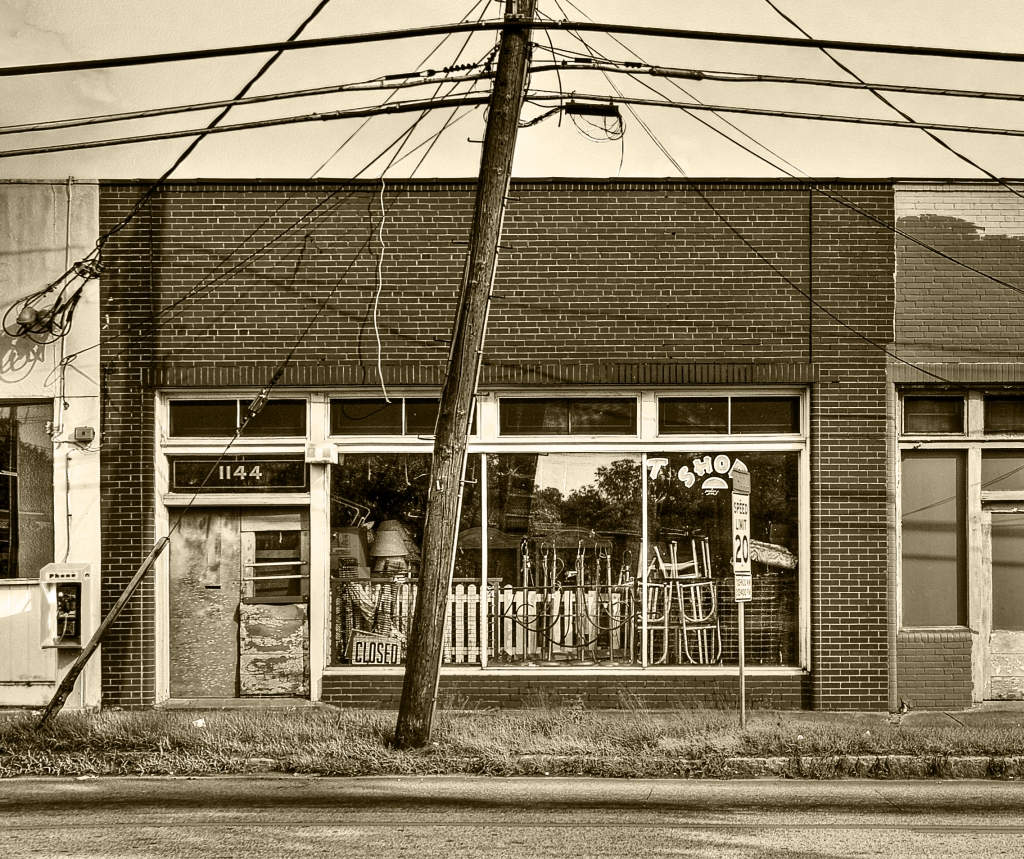
Anyway, I
was driving home and I passed a few old storefronts that I had been
meaning to shoot for years but had never followed through on. It was
an old beauty salon and thrift store a few blocks from the Medical
Center... the kind of old run-down place that most folks might overlook
or just consider ugly, but on closer examination really has a lot of
personality. After I did one series of shots (in between
the passing cars), I drove a bit further down the road and stopped to
shoot another place about a mile away, an old deserted gas station.
This was another one of those places I pass by a few times a
week, occasionally
wondering what kind of photo it'd make, but I always tell myself
I'm in too much of a
hurry to stop and grab some shots.
So here's the first place... this is the middle of five HDR shots, straight out of the camera: |
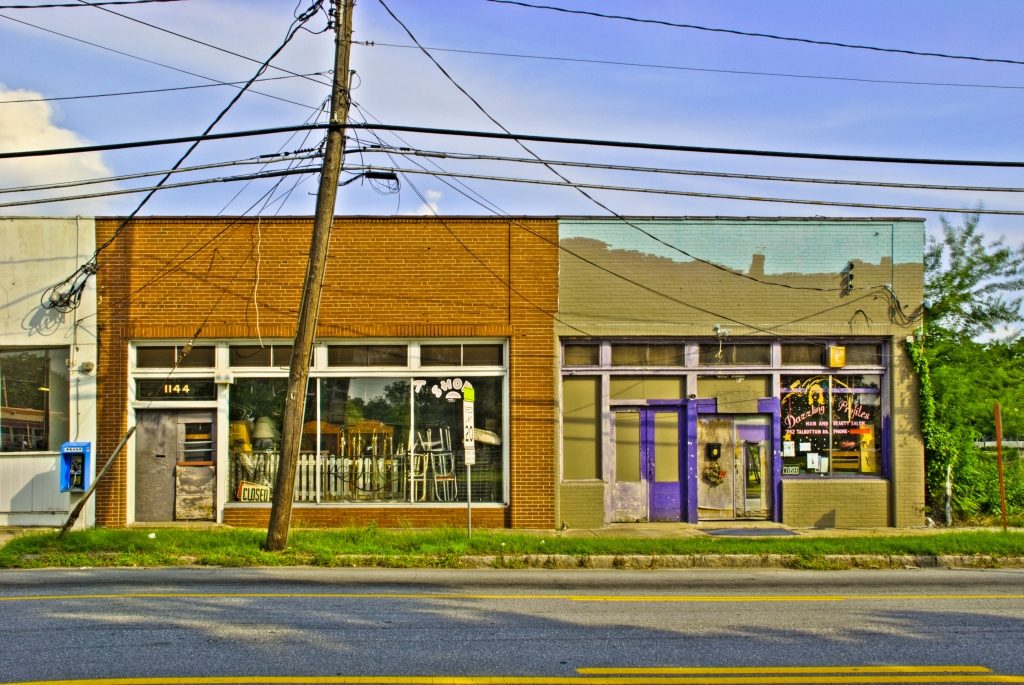
| After
merging the five files, I
brought it into Photomatix and had a lot of fun playing ... it
seemed to lend itself easily to varying treatments and over the course
of an hour or so I
did probably six or eight HDR versions. The first version I tried
to proceed fairly conservatively, just keeping the extra dynamic range
and adding a
little saturation boost: |

| The second version had a more typical HDR look, sort of painterly and flat: |
| The third one I took farther, jacking up both the contrast and saturation: |
The
results were not bad... at that point I almost stopped to relax on the couch with a
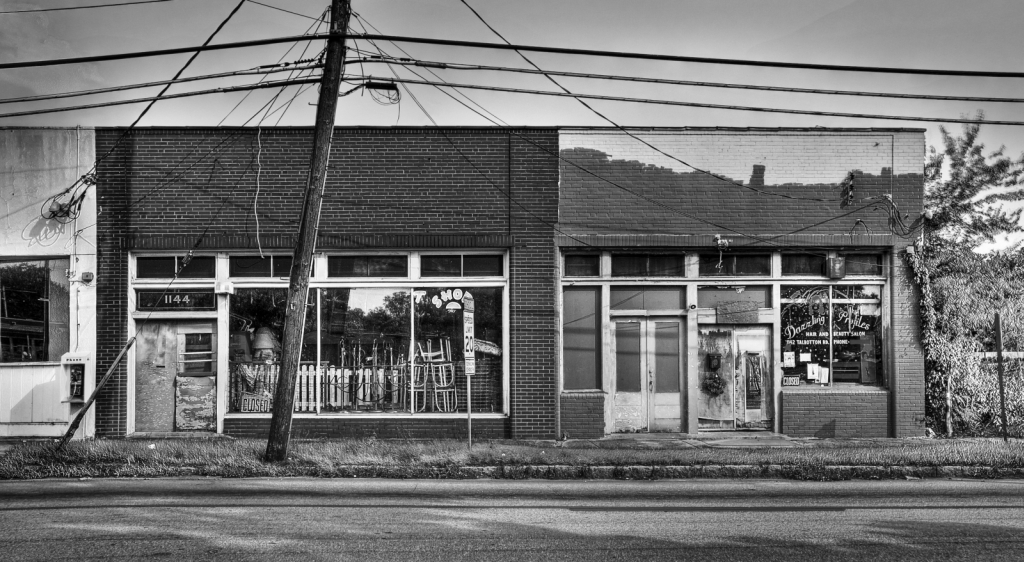
movie. But then I got to thinking about something Randall
mentioned... he wondered how HDR would look for black and white
images. So I decided to give it a try... I took the color 16-bit
file and reduced it with Photoshop's Black and White Conversion (which
is a bit like channel mixer... it lets you select separate values for
each color, rather than just globally desaturating the image).
Click to explore the full-size version of this image... it seems like there's detail everywhere and you can really get lost in it. |
Still there was something about all these versions that bothered me...
I liked them well enough but they didn't really knock me over.
Something just seemed to be a bit off. At first I thought it was that
telephone pole in front... but then I started wondering if maybe what
was wrong was that the two parts of the building were fighting each
other, or perhaps they were just a bit too much to take in all at once.
So I decided to zero in on each storefront and compose a photo of each. I went back to the
last tone-mapped image, the one with the rich, poster-like colors,
brought it into Photoshop and added the high-pass filter for the
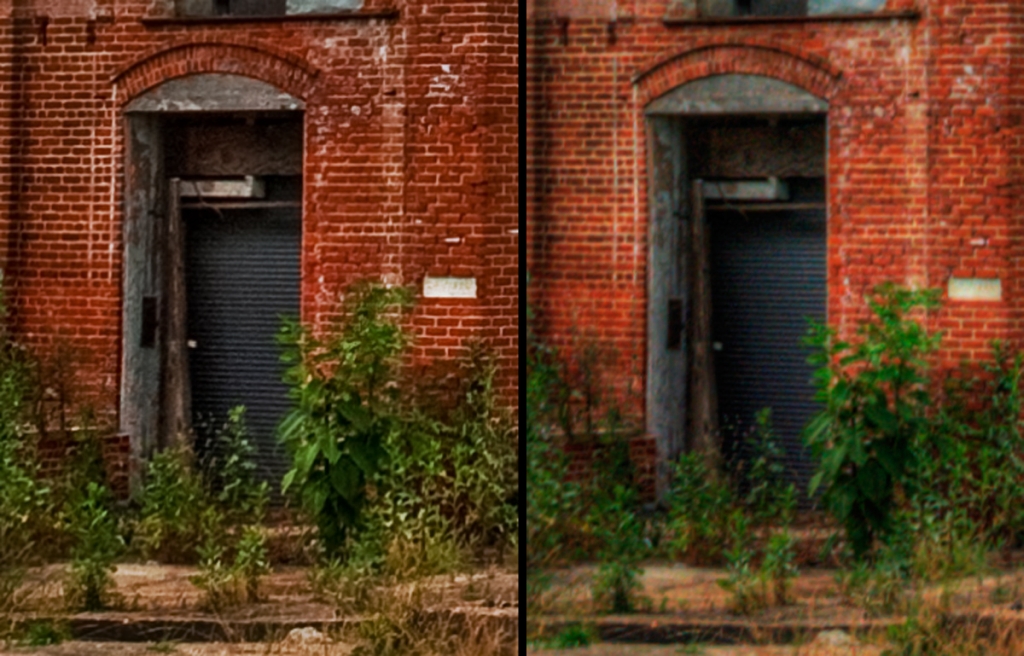
high-contrast sharpening effect. Then I cropped out each store: |
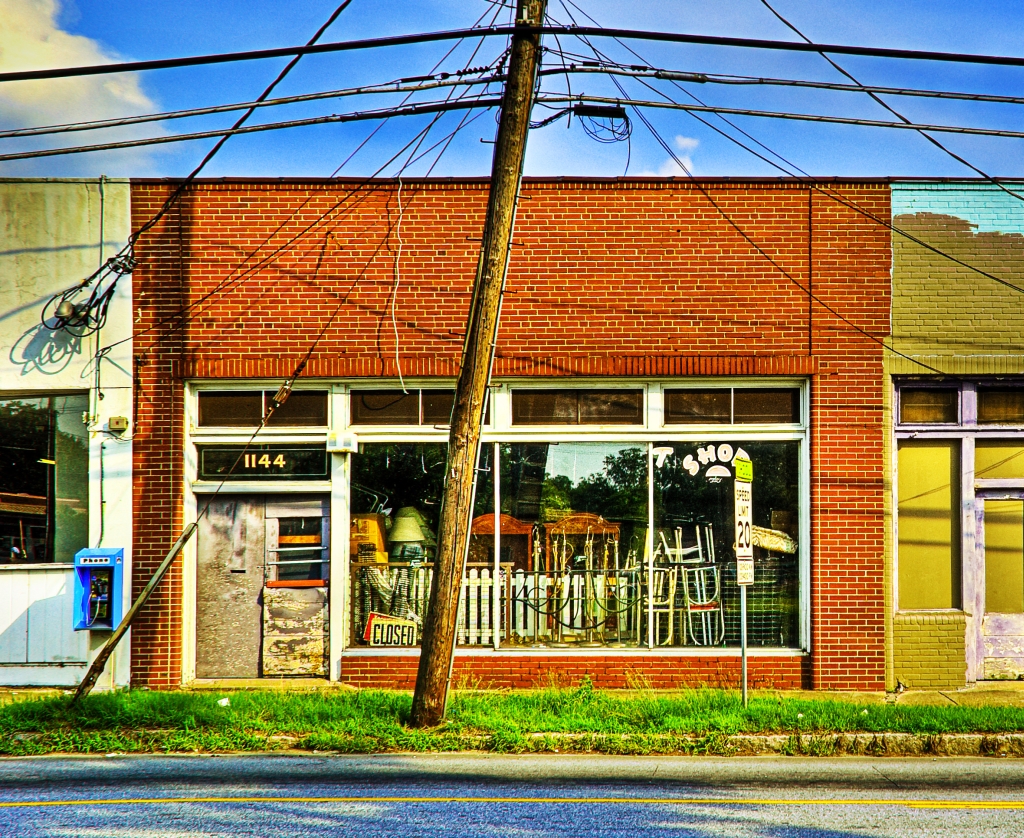
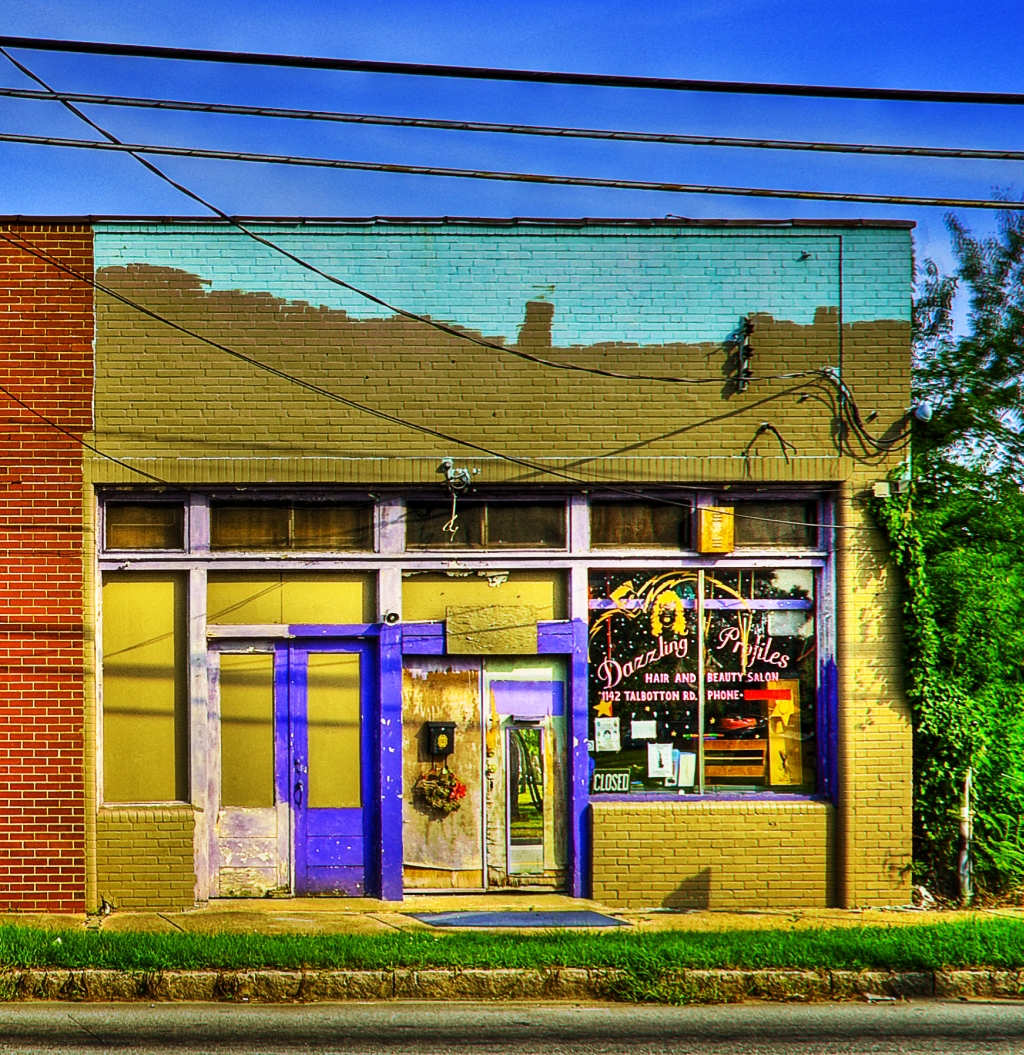
| I like these two a lot better. I also went back and did sepia-toned B&W versions of each that looked pretty good too: |
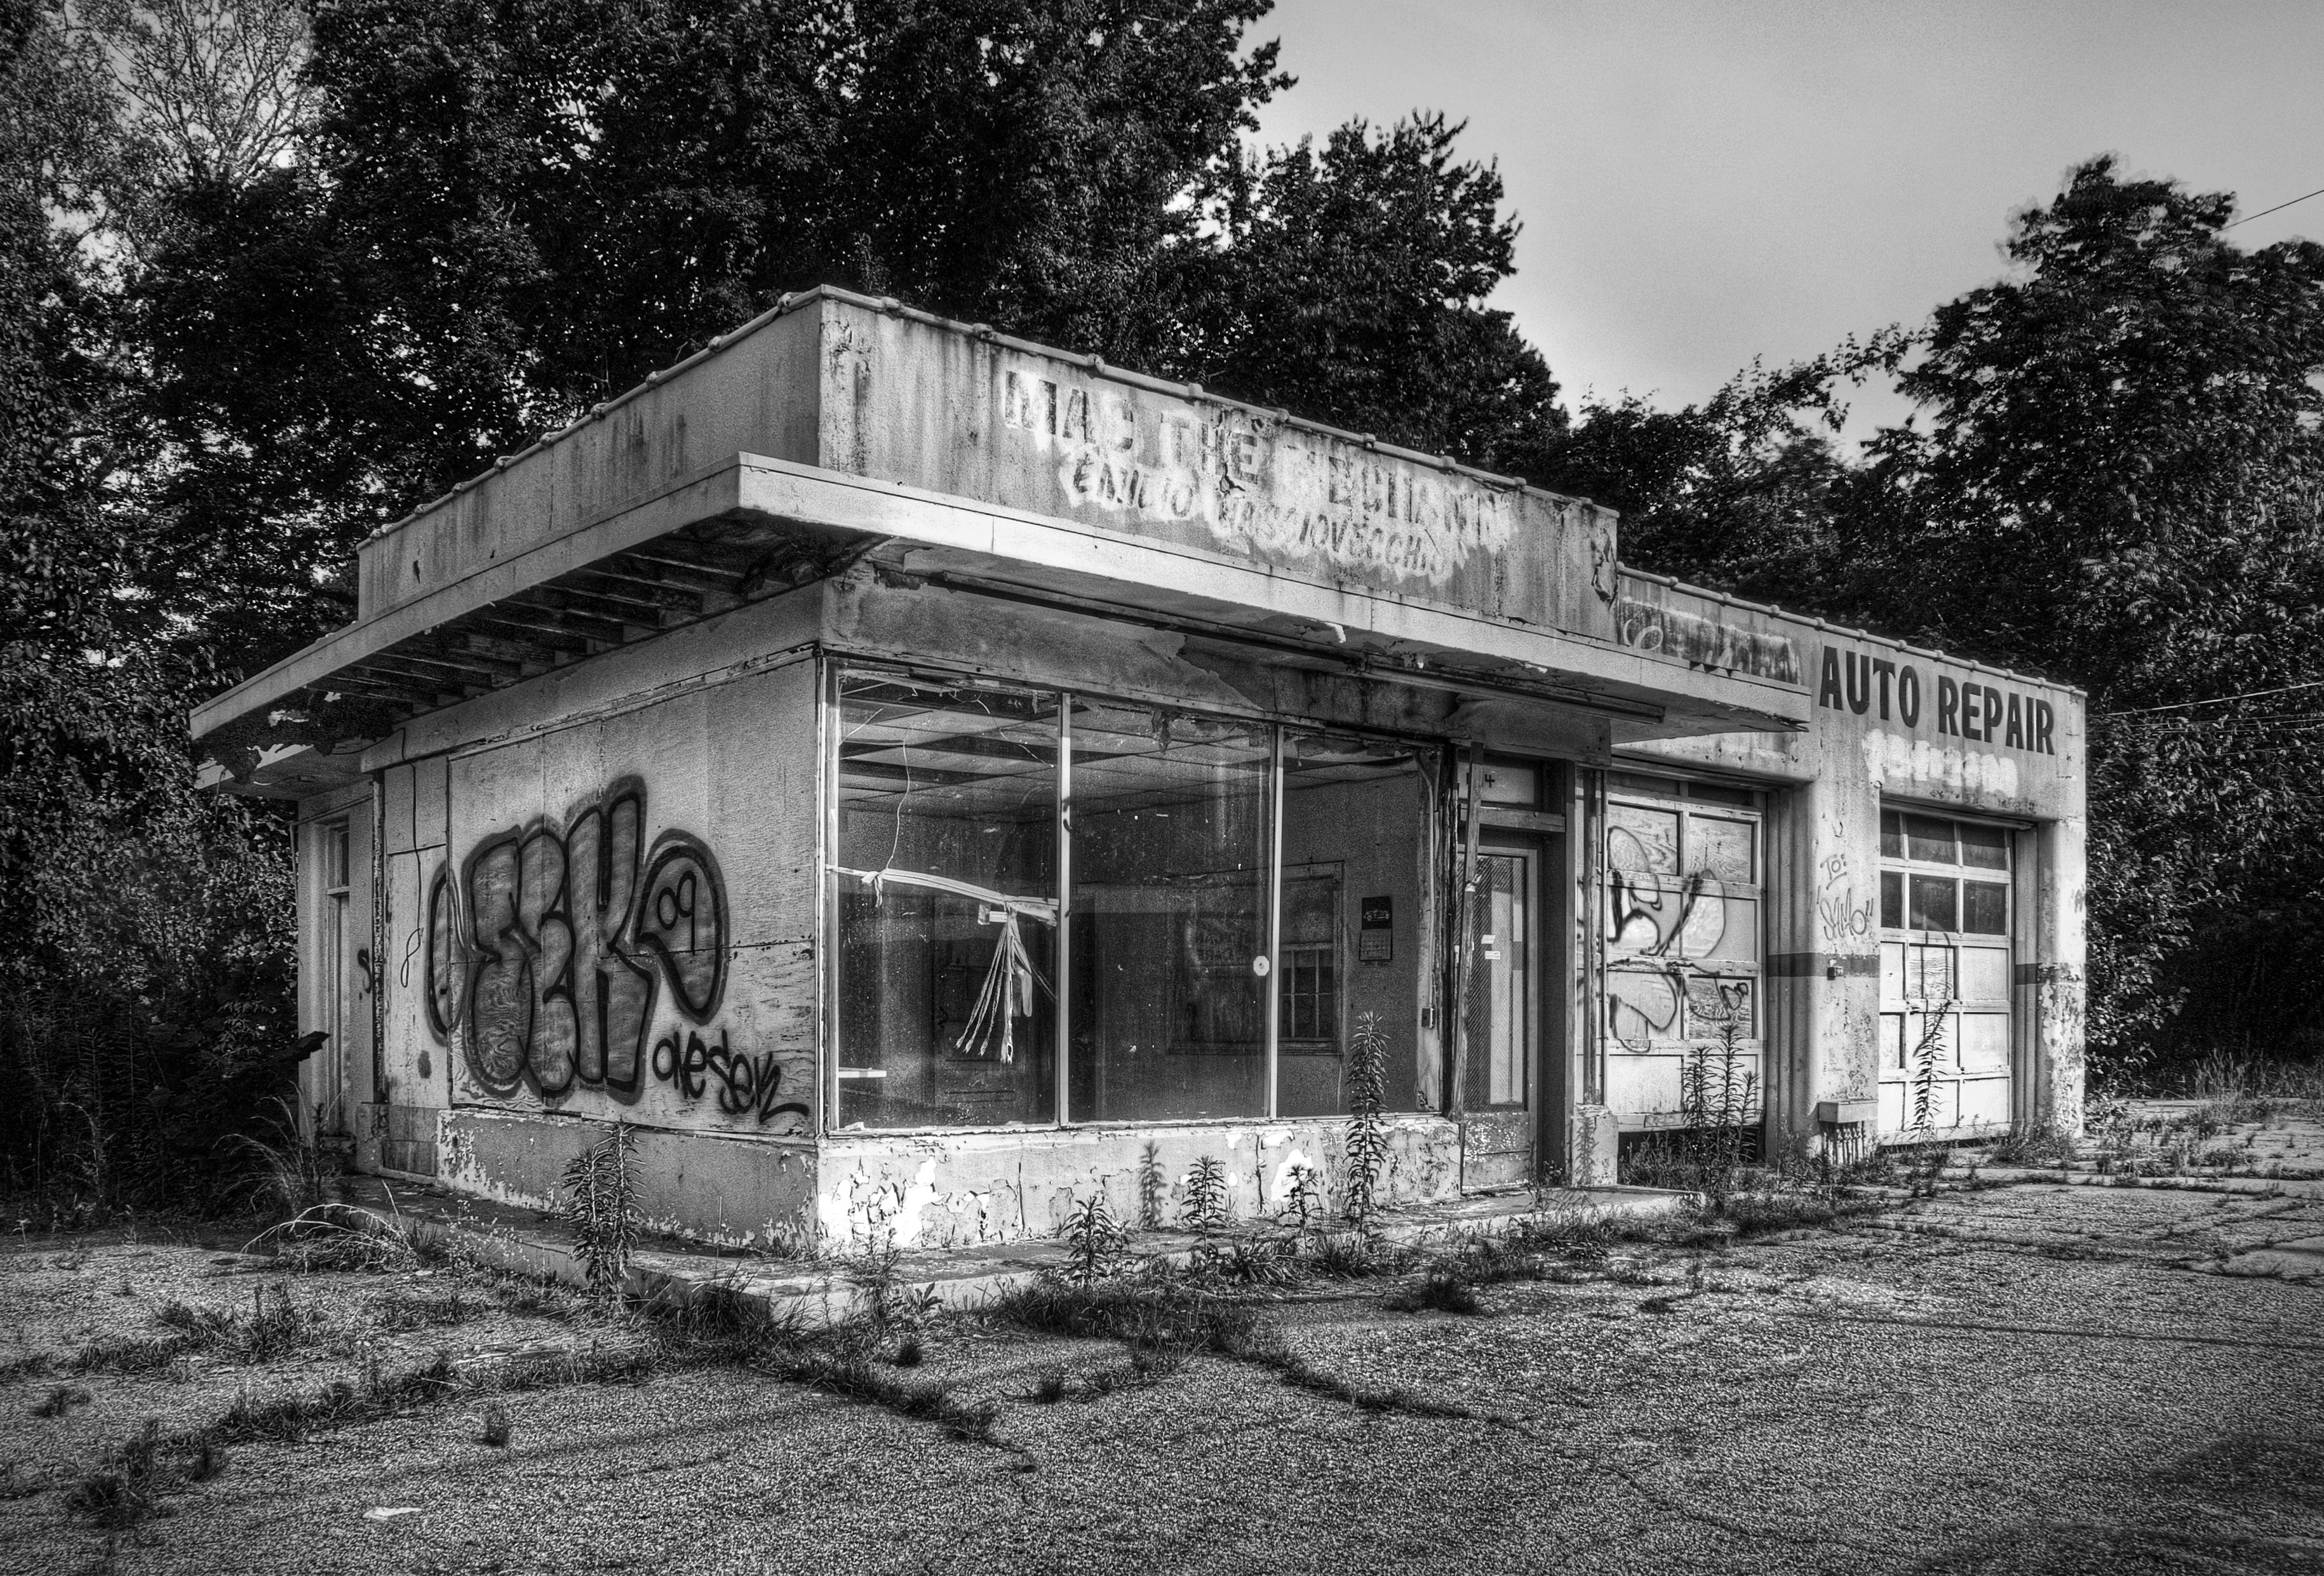
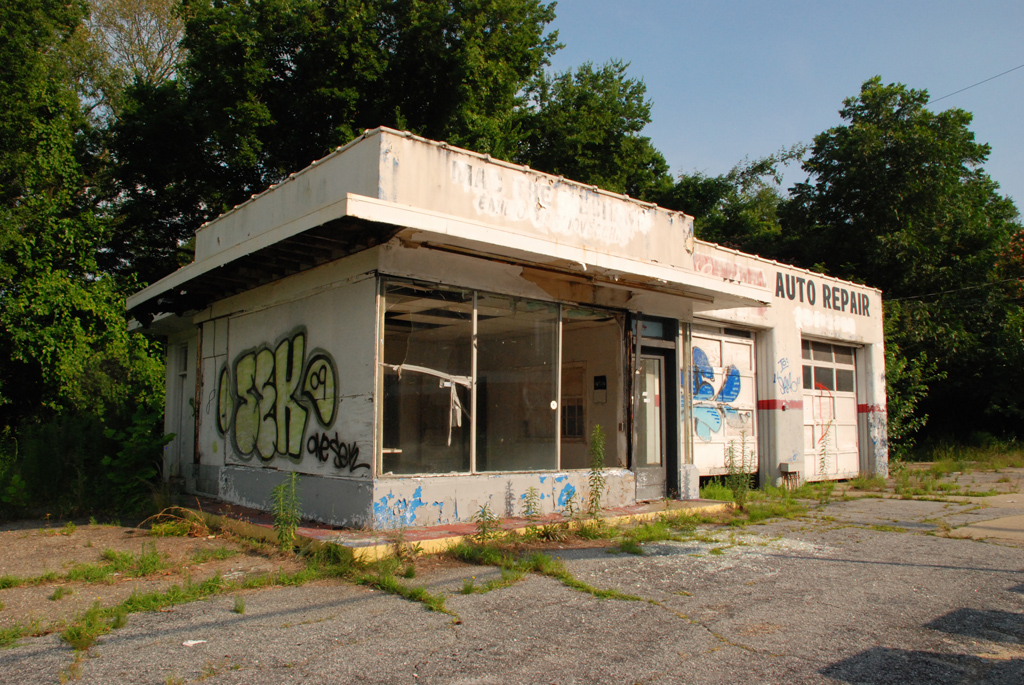
| The second shot was an old gas station on Warm Springs Road that has
been empty for years. I thought I would shoot it straight-on from
the opposite side of the street like I did with the two store fronts,
but as I walked around a bit I could see that wasn't going to
work. First of all, there were three gas pumps in front of the
building and it didn't look like I'd be able to include them in the
composition in a flattering way. Besides, there was some graffiti
on the left side of the building that I wanted to include so it looked
like a three-quarter view as going to work best. After looking at
the building from a few different distances, I settled on a close-in
view at my shortest focal length (18mm) because the extreme angles
seemed to work best. I was worried that the late afternoon sun
reflecting off the white of the building might still get blown out so I
took six images instead of the usual five (+4,+2, 0, -2, -4, -6).
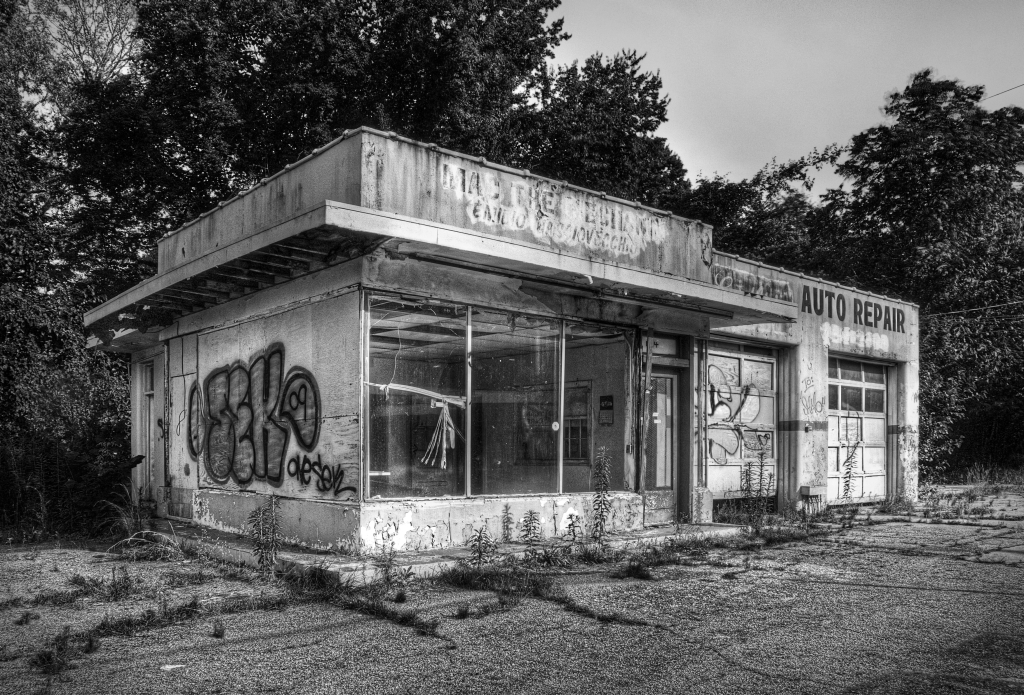
Here's the "0" image: |
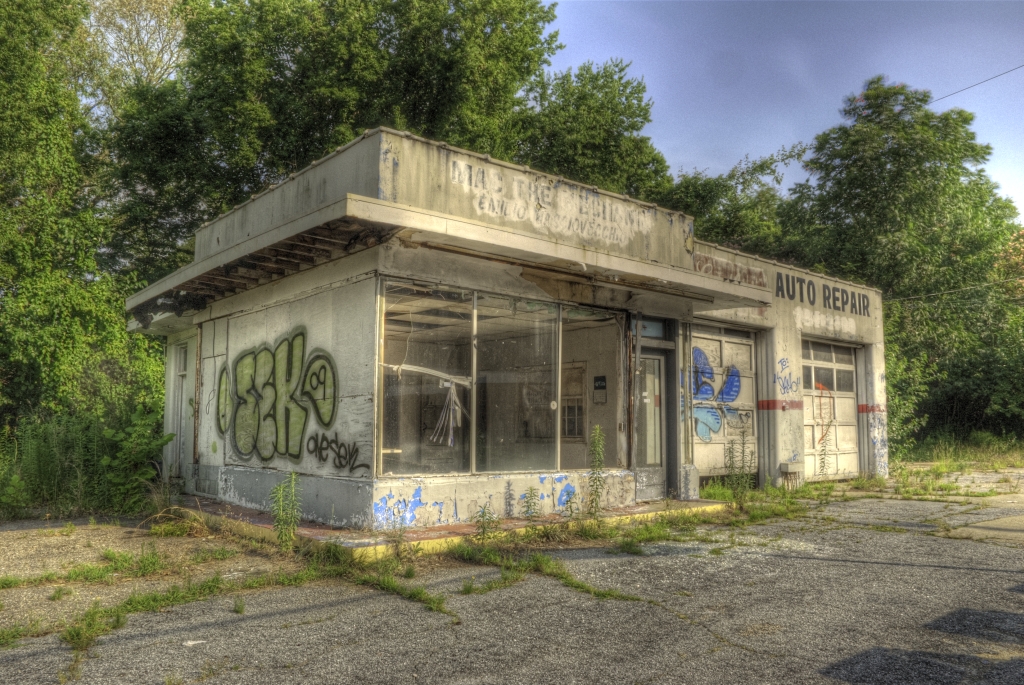
| I
didn't play with this image the way I did the previous one because I
had a better idea of where I wanted to go... I wanted to get as much
detail in both the trees and the building as possible, but not allow it
to flatten out too much since a lot of the attraction of this image is
in the way the building is both separate from and caressed by the
background trees. Another aim was to rescue some of the detail of
the signage on the top of the building... I didn't think I'd be able to
make it legible, but I was at least hoping to bring it out some.
After merging and tone-mapping the images, I succeeded on the latter
score... the building details popped out nicely. But the image
did flatten out quite a bit, both because of the way the trees opened
up and because the warmth of the afternoon sun made the building much
yellower as the darker images were merged into the whole. I also
noticed the effect of the breeze that was blowing... the tops of the
trees on the right were blurred, and the two pieces of tape hanging in
the front window had become four or five: |
| The
final step was to take the 16-bit merged image into Adobe Camera Raw to
enhance the detail and contrast (maybe make the trees a bit darker) and
to correct the color... I liked the tone of the afternoon sun but I had
a feeling that cooling the image down would make the building stand out
better. After doing all that, I took it into Photoshop to
correct the perspective a bit (I liked the left and right convergence
but I wanted to fix the verticals). I also added a High-Pass
layer to bring out the details. Finally, I cropped it in a bit,
burned the corners, and thought about retouching out the shadows of the
gas pumps in the lower right corner but finally decided to just leave
them. |
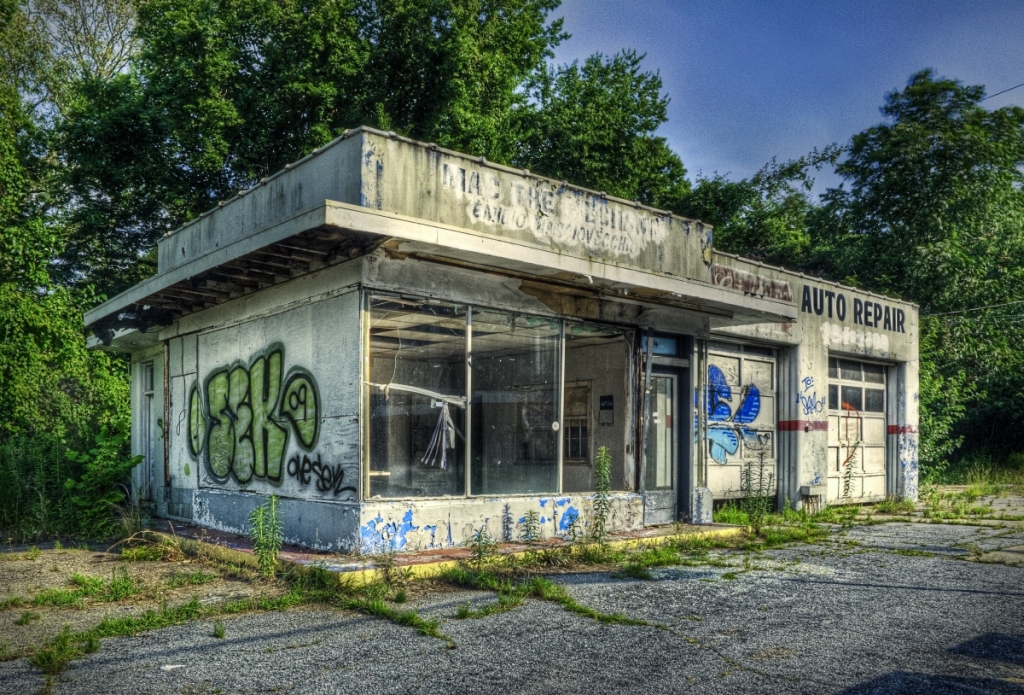
| Once I was satisfied with the results, I did a black and white version as well: |
All in all, not a bad day's work.
Those last two images are linked to full-size versions if you want to examine them in detail.
These images really are fun to explore at close range... partly because
of all the interesting information that the HDR process pulls out of every dark little
corner, and partly because of the way the high-pass filter sharpens and accentuates
the smallest details, almost like engraved currency. I find
myself scrolling around these images (not just mine, but HDR images in
general) almost the way I do with maps or aerial photos (two things
that have fascinated me since I was a kid). I still find myself
wondering what some of these images would look like at poster size.
You know, I am noticing something in this HDR work that I really
wasn't too aware of, but I am now seeing as a very important part of
the process. The above batch of images were the result of just
two photos. Well, eleven if you count all the unmerged
originals. But what I mean is, I set up the tripod twice and came
home with only two compositions. And it was not because I was in a
hurry, that's just the way it worked out. Same thing happened
when I went to the river to shoot the old mill and the power
station. Same thing when I went to Flat Rock park... I came home
with one scenic shot and one lichen closeup. Now that I think
about it, I haven't worked this way since college, when I had access to
the school's view camera and used to sign it out and go play Ansel
Adams. Given how much work it was to take a photo, and how much
sheet film cost, it was very rare for me to take more than two or three
images at once (and in fact, one of our class assignments was to take
that camera out with one piece of film and come back with a single
exposure). There is a discipline to shooting this way that is a
lot different from the spontaneous and flowing and at times non-stop
pace of shooting with a 35mm or digital camera. Actually, I'm not
sure I like calling it a discipline ... it certainly is that, but there
might be some negative connotations attached to that word, a feeling
that you are unnecessarily bound by rules or restrictions. That's
not really the case... maybe I'd call it 'deliberate,' or
'methodical,' or 'thoughtful.' All I know is, it is a very
calming and peaceful act to set up a tripod and compose the best single
shot you can of a subject that is not going to fly away, then pick up
your gear and go home.
I like this. |
|
| |
| |
|
| |
| |
| |
| |
| |
| |
| |